How to use setup scripts in Magento 2
Setup scripts are an essential tool when writing your own custom modules. But there are a lot of changes between how these are handled in Magento 1 versus Magento 2 (now known as Magento Commerce/Magento Open Source).
Magento 2 setup script changes
Let's start by taking a quick look at the key differences in how setup scripts are handled in Magento 1 versus 2 versions:
| Magento 1 | Magento 2 |
|---|---|
|
Configuration cache clear essential |
Configuration cache clear optional |
| Scripts triggered after configuration cache clear (by default) | Scripts triggered using Magento CLI tool |
| Data and schema scripts in separate folders | Data and schema scripts in same folder |
| Upgrade scripts in separate files |
Upgrade scripts in single files |
|
Uses table core_resource |
Uses table setup_module |
|
No concept of recurring script |
New recurring script type runs every time a setup command is triggered |
|
No concept of uninstall script |
New uninstall script type runs when module is uninstalled (composer only) |
Directory structure
In Magento 1, there were separate module folders for the schema and data scripts. However, in Magento 2 this has been simplified to use a single module folder called Setup, as demonstrated in the following screenshot
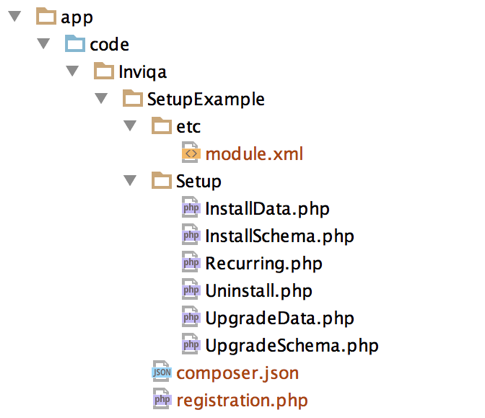
Additionally, you will see that there is only one schema upgrade script and only one data upgrade script – the file version numbering of Magento 1 has been abandoned. Upgrade scripts will be explained in more detail below.
Running setup scripts
Setup scripts are triggered using the Magento 2 Command Line Interface (CLI) tool. There are a few different commands to achieve this:
| Command | Description |
|---|---|
|
magento setup:upgrade |
Runs schema and data changes combined |
|
magento setup:db-schema:upgrade |
Runs schema changes only |
|
magento setup:db-data:upgrade |
Runs data changes only |
Typically, you will use magento setup:upgrade to trigger the scripts as it ensures that the schema and data scripts are run in sequence, and ensures that any dependencies are generated prior to running the scripts. However, magento setup:db-schema:upgrade and magento setup:db-data:upgrade do allow the scripts to be executed independently, and do not require the configuration cache to be cleared.
Version tracking
When a module is first installed, an entry is added to the setup_module table for that module, using the setup_version attribute value specified in etc/module.xml:
<?xml version="1.0"?>
<config xmlns:xsi="http://www.w3.org/2001/XMLSchema-instance" xsi:noNamespaceSchemaLocation="urn:magento:framework:Module/etc/module.xsd">
    <module name="Inviqa_SetupExample" setup_version="1.0.0" />
</config>
So the above example would create the following database entry:
mysql> select * from setup_module where module = "Inviqa_SetupExample";
+---------------------+----------------+--------------+
| module              | schema_version | data_version |
+---------------------+----------------+--------------+
| Inviqa_SetupExample | 1.0.0          | 1.0.0        |
+---------------------+----------------+--------------+
There is a potential pitfall here in that when a module is installed, an entry is added to the setup_module table regardless of whether any install scripts are present. So if the install scripts are created after the module is installed, they will never be executed. If you are developing a module and hit this problem, you will need to manually delete the module entry in the setup_module table.
As their names imply, the Setup/InstallSchema.php and Setup/InstallData.php scripts are run when the module is first installed and are used to modify the database structure and content respectively.
An example of a Setup/InstallSchema.php script looks like this:
<?php

namespace Inviqa\SetupExample\Setup;

use Magento\Framework\Setup\InstallSchemaInterface;
use Magento\Framework\Setup\ModuleContextInterface;
use Magento\Framework\Setup\SchemaSetupInterface;

class InstallSchema implements InstallSchemaInterface
{

    public function install(SchemaSetupInterface $setup, ModuleContextInterface $context)
    {
        $installer = $setup;

        $installer->startSetup();

        $table = $installer->getConnection()
            ->newTable($installer->getTable('inviqa_example'))
            ->addColumn(
                'entity_id',
                \Magento\Framework\DB\Ddl\Table::TYPE_INTEGER,
                null,
                ['identity' => true, 'unsigned' => true, 'nullable' =>
false, 'primary' => true],
                'Entity ID'
            )
            ->addColumn(
                'name',
                \Magento\Framework\DB\Ddl\Table::TYPE_TEXT,
                255,
                ['nullable' => false],
                'Name'
            )
            ->setComment('Inviqa Example');
        $installer->getConnection()->createTable($table);

        $installer->endSetup();
    }
}
As you can see, once the InstallSchemaInterface interface is implemented, all the setup code is placed within the install method. The example setup code uses Data Definition Language (DDL) to create a simple table called inviqa_example. DDL was added to later versions of Magento 1 to allow schema definitions and changes to be written in a cross database compatible format, and these changes have been carried through into Magento 2.
The Setup/InstallData.php script follows a similar convention but instead implements InstallDataInterface. Here’s an example:
<?php

namespace Inviqa\SetupExample\Setup;

use Magento\Framework\Setup\InstallDataInterface;
use Magento\Framework\Setup\ModuleContextInterface;
use Magento\Framework\Setup\ModuleDataSetupInterface;

class InstallData implements InstallDataInterface
{
    public function install(ModuleDataSetupInterface $setup, ModuleContextInterface $context)
    {
        $setup->getConnection()->query("INSERT INTO inviqa_example SET name = 'Test 1'");
    }
}
In this example, the setup code uses raw SQL to insert a row into the newly created inviqa_example table.
Upgrade scripts
As their names imply, the Setup/UpgradeSchema.php and Setup/UpgradeData.php scripts will update the database structure and content respectively. Updating the setup_version attribute value in etc/module.xml will prompt the upgrade scripts to be run the next time magento setup:upgrade is executed from the CLI.
An example of a Setup/UpgradeSchema.php script looks like this:
<?php

namespace Inviqa\SetupExample\Setup;

use Magento\Framework\Setup\UpgradeSchemaInterface;
use Magento\Framework\Setup\ModuleContextInterface;
use Magento\Framework\Setup\SchemaSetupInterface;

class UpgradeSchema implements UpgradeSchemaInterface
{
    public function upgrade(SchemaSetupInterface $setup, ModuleContextInterface $context)
    {
        $setup->startSetup();

        if (version_compare($context->getVersion(), '1.1.0', '<=')) {

            $setup->getConnection()->addColumn(
                $setup->getTable('inviqa_example'),
                'email',
                [
                    'type' => \Magento\Framework\DB\Ddl\Table::TYPE_TEXT,
                    'length' => 255,
                    'nullable' => true,
                    'comment' => 'Email'
                ]
            );

        }

        $setup->endSetup();
    }
}
Here you can see a similar pattern to the install scripts, only in this case UpgradeSchemaInterface is implemented and the setup code is placed within the upgrade method. The setup code uses DDL to add an extra column to the inviqa_example table.
The key thing to notice here though is the use of the following code to isolate the changes:
if (version_compare($context->getVersion(), '1.1.0', '<')) {
            // setup code here
        }
This will ensure that the changes are only run when the setup version is changed to 1.1.0 and then ignored on subsequent version increments. Any code outside such a construct will be executed on every upgrade, which would probably not be what is intended.
The Setup/UpgradeData.php script follows the same convention. Here’s an example:
<?php

namespace Inviqa\SetupExample\Setup;

use Magento\Framework\Setup\UpgradeDataInterface;
use Magento\Framework\Setup\ModuleContextInterface;
use Magento\Framework\Setup\ModuleDataSetupInterface;

class UpgradeData implements UpgradeDataInterface
{
    public function upgrade(ModuleDataSetupInterface $setup, ModuleContextInterface $context)
    {
        $setup->startSetup();

        if (version_compare($context->getVersion(), '1.1.0', '<=')) {
            $setup->getConnection()->query("INSERT INTO inviqa_example SET name = 'Test 2', email = '[email protected]'");
        }

        $setup->endSetup();
    }
}
This also uses the version comparison to ensure that upgrades are tied to a specific version.
Recurring scripts
A new feature in Magento 2 is recurring scripts, which can be created in your module at Setup/Recurring.php.
Recurring scripts run every time magento setup:upgrade is run. At first glance this might not seem much different from an upgrade script without a version comparison, but the latter only executes when the version is incremented.
The only use of recurring scripts in the core code at present is in Magento\Indexer\Setup\Recurring, which validates entries in the index_state table.
The following example shows how to create a recurring script (even if the purpose is contrived and not really representative of what a recurring script would be used for).
<?php

namespace Inviqa\SetupExample\Setup;

use Magento\Framework\Setup\InstallSchemaInterface;
use Magento\Framework\Setup\ModuleContextInterface;
use Magento\Framework\Setup\SchemaSetupInterface;

class Recurring implements InstallSchemaInterface
{
    public function install(SchemaSetupInterface $setup, ModuleContextInterface $context)
    {
        $setup->startSetup();

        $setup->getConnection()->query("INSERT INTO inviqa_example SET name = 'Test 3', email = '[email protected]'");

        $setup->endSetup();
    }
}
Here you can see that recurring scripts do not have their own interface type, but actually reuse InstallSchemaInterface and the recurring setup code is inside the install method.
Uninstall scripts
Another new feature in Magento 2 is ‘uninstall scripts’, which can be created in your module at Setup/Uninstall.php. They give module developers the opportunity to tidy up the database when their module is removed.
<?php

namespace Inviqa\SetupExample\Setup;

use Magento\Framework\Setup\UninstallSchemaInterface;
use Magento\Framework\Setup\ModuleContextInterface;
use Magento\Framework\Setup\SchemaSetupInterface;

class Recurring implements UninstallSchemaInterface
{
    public function uninstall(SchemaSetupInterface $setup, ModuleContextInterface $context)
    {
        $setup->startSetup();

        $setup->getConnection()->query("DROP table inviqa_example");

        $setup->endSetup();
    }
}
As you can see, the uninstall code removes the inviqa_example table from the database.
Uninstall scripts currently only work when a module has been installed via Composer, and is then subsequently uninstalled using the module:uninstall CLI command.
Maintainability
The departure from the complicated install/upgrade file formats of Magento 1 where module version was part of the file name has definitely simplified the implementation of upgrade scripts in Magento 2 (now known as Magento Commerce). However, it comes at the cost of maintainability, as all updates are now initiated from a single file. This could quickly lead to some very bloated upgrade files.
The onus will therefore be on the module developer to implement a maintainable structure. Fortunately, the new Dependency Injection implementation makes this reasonably easy.
However, this does not solve the curse of Magento 1 projects, which was merging project branches which had both upgraded to the same version numbers. Avoiding this will still require good developer communication.
Related reading
- Getting Started with Magento Web APIs
- Magento 2 REST API swagger schema
- Magento 2: Understanding the Web API Architecture
- Magento 2 migration: the complete guide
About the author
Phillip has more than 13 years' experience designing and building web applications, with the last five years spent exclusively on Magento projects at Inviqa. Prior to that, he worked in a variety of roles including server- and client-side development, client-/server-side integration and interface design.