Magento Commerce tutorial: site performance tips
One of Magento’s biggest selling points is that the ecommerce platform provides an all-in-one solution, plus flexibility. This comes at a cost however; the underlying system is complex and requires work to make it run efficiently. Read on to learn about the measures you can take to improve the performance of your Magento Commerce site.
Improving site performance
The Magento Commerce documentation provides comprehensive information on how to configure and optimise your Magento installation, but with such a wealth of information it can be difficult to know the difference between what you can do, and what you should do to improve your site performance.
Taking inspiration from Magento’s own top tips, this post highlights a few things that will help make Magento run more optimally.
Before we begin, it’s useful for you to know that, for the purposes of this blog post, a Magento Commerce demo instance was set up using Apache Bench to simulate ten consecutive requests against the site. This is to show the relative gains of certain steps when improving performance, and is not intended to be indicative of a site’s capability to handle an amount of traffic.
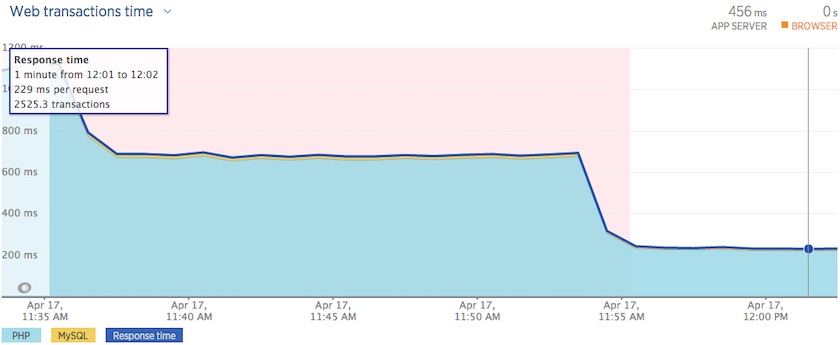
The baseline for a demo site installed with Magento 2.1.4 and Magento’s sample data, on a Digital Ocean 2GB droplet with PHP 5.6, before any of the optimisation steps, is as follows:
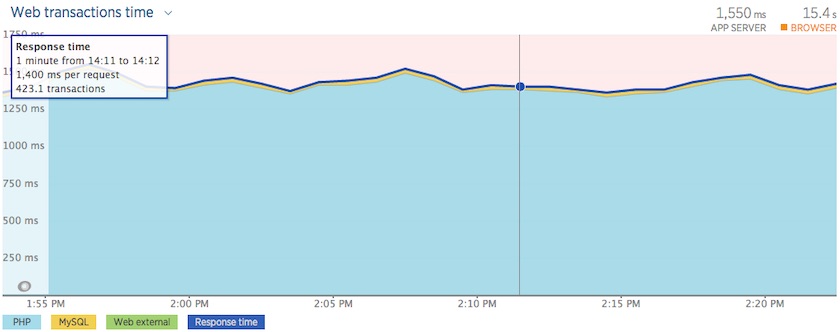
You should always try to make a single change at a time and gauge the difference it makes to performance before proceeding to the next change. In some cases, a change expected to have a positive impact may have the opposite effect or cause other side-effects or problems, so it is important to know what impact a single change has.
Magento deploy mode
In Magento Commerce there are three different deploy modes affecting things such as error reporting, DI generation, and static asset generation. There are three different modes: default, developer, and production.
In developer mode, Magento Commerce will compile dependency injection files and static files on the fly, making it easier to work with the application when developing new features. It is also much stricter with error reporting, with even notices causing a halt in page execution. It also includes some debug headers, to help identify issues during development.
The production mode requires the pre-compilation of the DI and static files, which speeds up the application as it no longer has to do this step on the fly.
The default mode is a halfway house between the two, suppressing some of the developer features that would expose sensitive information, but leaving the dynamic generation of the static files in place, which will have an impact on site performance.
You can ensure a production site is in the correct mode by running the following command in the site root on the server:
bin/magento deploy:mode:set productionThis will place the site into maintenance mode, generate the DI and static files, set the production mode, and finally disable maintenance mode. If you run into issues you can run the generation commands in isolation, and run the command above with the skip compilation flag to set the production mode:
bin/magento setup:di:compile
bin/magento setup:static-content:deploy [locales]
bin/magento deploy:mode:set production -s
You must ensure you include any locales for your site in the static-content deploy step as only en_US is built by default. This is provided as a list after the deploy command. For example:
bin/magento setup:static-content:deploy en_GB fr_FR de_DEEnabling production mode affected the demo site as follows:
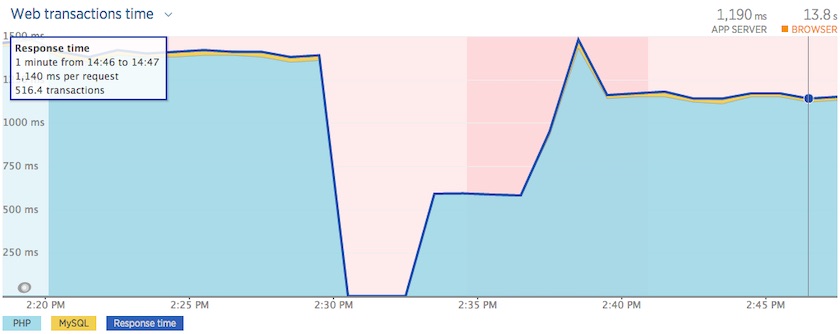
As can be seen, the overall effect is to reduce the application processing time.
PHP version
Magento 2.1 is built to support PHP 5.6 and 7.0, with support for 7.1 coming in version 2.2. PHP 7 has been available for some time now and offers significant performance improvements over earlier versions of PHP. If you are building your infrastructure from scratch, there really is no reason to use an earlier version.
The following graph shows the improvement in performance when upgrading from PHP 5.6 to PHP 7.0:
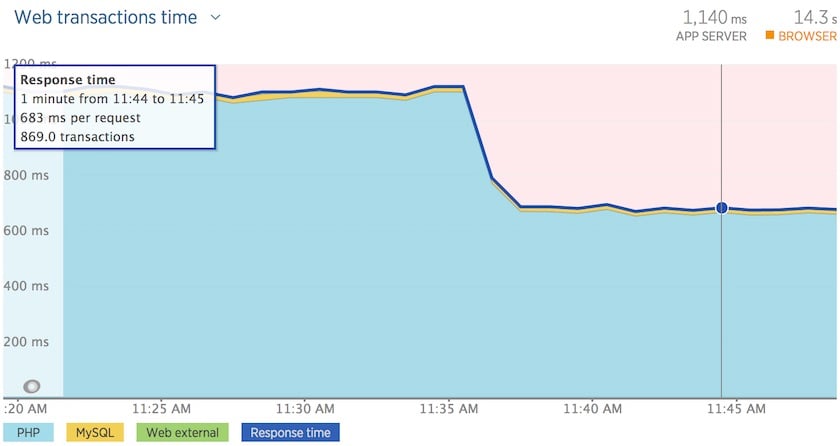
The overall effect shows a significant improvement.
PHP opcache
When a request is made for a PHP web page, the web server must retrieve the PHP files from disk, and byte-compile them, before it can execute the code, compile the page, and send it back to the user. Disk access is a slow process and performing this on every page request adds a significant overhead to the load time.
The Opcache will store the byte-compiled files in memory, allowing the disk-access and compiling step to be bypassed on subsequent requests, greatly reducing the time taken to serve users and increasing the throughput of the server at the expense of increased memory usage.
Here we see the improvement gained by enabling the opcache on PHP 5.6:
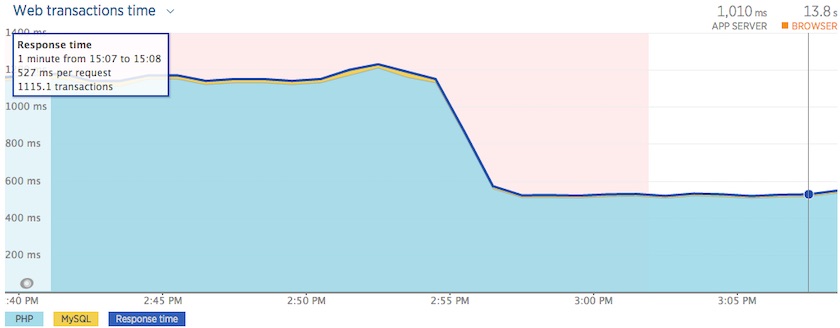
And the following graph shows the improvements on PHP 7.0:
This shows that use of opcache can offer a significant improvement in site performance. Opcache can be installed and enabled very easily, and so is a quick way to achieve performance gains on an active website.
Backend cache
Magento Commerce will use the filesystem for backend cache, which can be slow. Switching to using a fast-cache service such as Redis can have a marked improvement on Magento 2 performance. You must install the redis server and optionally the PHP redis extension on the web server.
Redis can then be enabled by adding the following configuration sample from the Magento documentation to the app/etc/env.php file:
'cache' =>
  array (
    'frontend' =>
    array (
      'default' =>
      array (
        'backend' => 'Cm_Cache_Backend_Redis',
        'backend_options' =>
        array (
          'server' => '127.0.0.1',
          'database' => '0',
          'port' => '6379',
        ),
      ),
      'page_cache' =>
      array (
        'backend' => 'Cm_Cache_Backend_Redis',
        'backend_options' =>
        array (
          'server' => '127.0.0.1',
          'port' => '6379',
          'database' => '1',
          'compress_data' => '0',
        ),
      ),
    ),
  ),
Here we are configuring Redis for page cache, however we recommend switching to using Varnish for this purpose (more on that later).
Session storage
When installing Magento Commerce for the first time you have the choice of using the filesystem or using the database. The database is generally going to be faster, but this will place additional load on the database server.
Using a separate service like memcached or redis will keep load off the database server, and can be faster and these services keep the data in memory. These days we prefer redis over memcached, as redis will persist the session data between service restarts and server reboots.
To use a service such as redis the package must be installed, as well as the PHP extension to interact with the service. The app/etc/env.php file must then be updated with the following sample from the Magento documentation to specify the new service:
'session' =>
  array (
    'save' => 'redis',
    'redis' => array(
      'host' => '127.0.0.1',
      'port' => '6379',
      'password' => '',
      'timeout' => '2.5',
      'persistent_identifier' => '',
      'database' => '2',
      'compression_threshold' => '2048',
      'compression_library' => 'gzip',
      'log_level' => '1',
      'max_concurrency' => '6',
      'break_after_frontend' => '5',
      'break_after_adminhtml' => '30',
      'first_lifetime' => '600',
      'bot_first_lifetime' => '60',
      'bot_lifetime' => '7200',
      'disable_locking' => '0',
      'min_lifetime' => '60',
      'max_lifetime' => '2592000'
    )
  ),
After making this update it will be necessary to clear the backend cache, and ensure the site still works as expected.
Full page cache
In Magento 1, only Enterprise Edition had a native full page cache. Magento Commerce now includes the full page cache in Community Edition as well. By default, this will use the filesystem and ensuring it is enabled will allow for some significant performance gains. If you made the configuration change for backend cache earlier, this will divert the full page cache to Redis.
Magento Commerce can utilise Varnish for full page caching instead, although this is a little more complex to set-up. Varnish is much faster as it sits in front of the web server, storing the constructed page in system memory, allowing it to return the page to the end user without accessing the Magento application at all.
The Varnish server must be installed, but no PHP extension is required. Varnish itself will listen on port 6081 by default.
Generally, we will want to switch Varnish to port 80, and then switch the webserver to listen on port 8080. This is so that any HTTP requests reaching the server will be served by Varnish first, and Varnish will proxy any uncached requests onto the webserver.
Find the varnish configuration file containing the VARNISH_LISTEN_PORT value, and change it to 80, and update your webserver configuration and virtual host directives for port 8080.
Once varnish is installed and the configuration updated, check which version you have enabled:
varnishd -VYou must then log into the Magento admin, then select the ‘Stores’ => ‘Configuration’ option. Under, ‘Advanced’ => ‘System’ there is a full page cache section. Here, you should deselect the ‘Use system value’ box, then switch to ‘Varnish Cache (Recommended)’, and fill in the appropriate values in the ‘Varnish Configuration’ section:
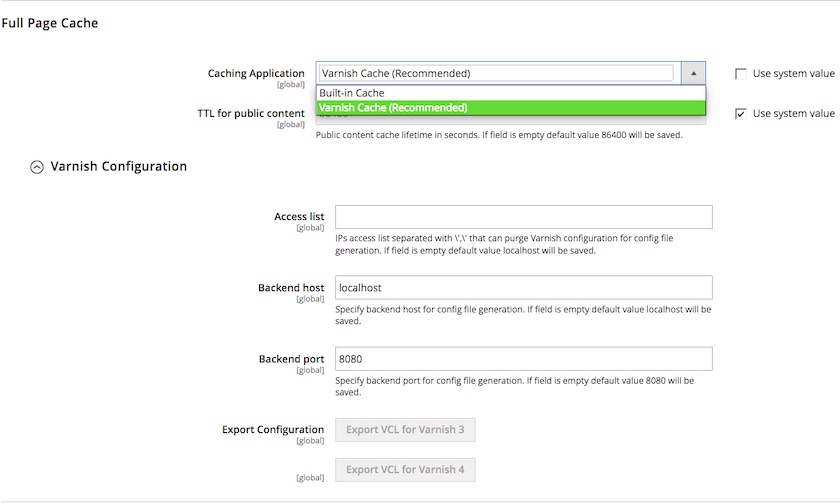
The configuration must be saved before proceeding. Finally, click the appropriate ‘Export VCL’ button and download the Varnish VCL file configuration. This should be prepopulated with the values you saved earlier. This configuration file must be uploaded to the varnish server, and either replace the default.vcl file, or update the value of VARNISH_VCL_CONF.
In order to ensure the Varnish cache can be cleared, you must also add a node to your env.php to tell Magento how to communicate with varnishadm:
'http_cache_hosts' =>
  array (
    0 =>
    array (
      'host' => '127.0.0.1',
      'port' => '80',
    ),
  ),
Substitute the host and port with the values that are correct for your varnish host.
Finally, reload the webserver service, and start the varnish service.
CSS and JS merging and minifying
By default, all CSS and JS files are listed separately as-is. This can increase site load times as each separate file results in a separate request from the browser to the webserver. Merging the files will result in fewer requests, but the combined file will be much larger in size.
In an ideal situation, this will be downloaded only once and then cached by the browser, thus subsequent page requests will be faster.
On the other hand, different pages can have different combinations of CSS and JS files, and thus will result in a different merged file that then has to be downloaded again. This can still be of benefit as different catalog pages should result in the same set of files.
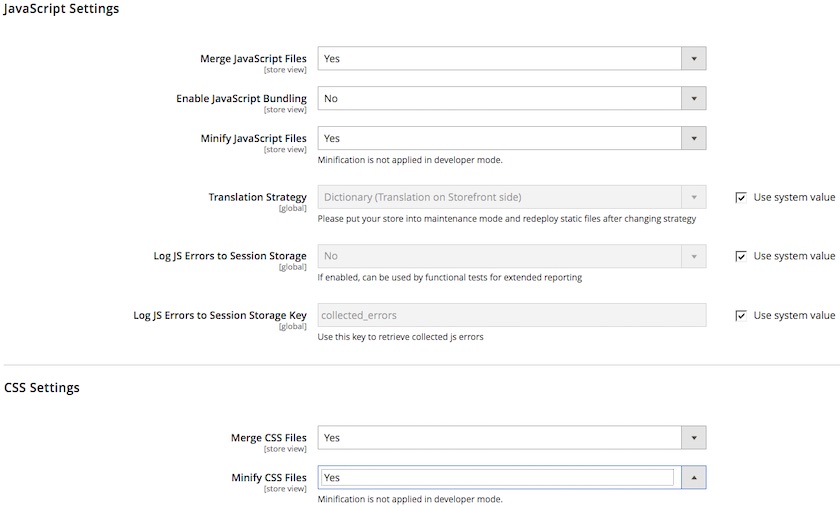
CSS and JS file merging, bundling, and minifying can be enabled in the admin, in the ‘Stores’ => ‘Configuration’ => ‘Advanced’ => ‘Developer’ section:
After saving the changes, the backend cache must be cleared, and the static content regenerated. This is best done via the Magento CLI tool:
bin/magento cache:clean config
bin/magento setup:static-content:deploy en_US en_GB fr_FR de_DE
In the command above, ensure you specify the locales relevant to your website.
A word of warning: some CDN and caching services also provide functionality for minifying JS, CSS and HTML on-the-fly, as well as tools such as grunt and gulp. These features may interfere with each other if all enabled together. It is recommended that you allow minification from only one source, and leave it disabled in all others.
Javascript Bundling can yield a boost in frontend performance, but to get the best results the JS files to include (and exclude) on which pages needs to be configured through XML, and this requires some careful consideration. As such, it’s not a case of simply turning this option on.
Enable flat indexing
As in Magento 1, Magento 2 utilises an EAV structure for various things such as product attributes. This incurs an overhead in application runtime, and so Magento utilises flat tables for storing the data in a format that can be accessed much faster.
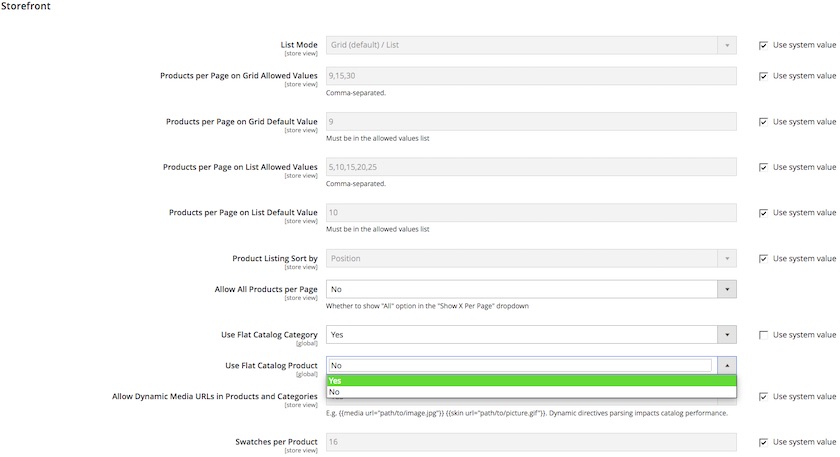
In the Magento Admin, under 'Stores' => 'Configuration' => 'Catalog' => 'Catalog' expand the 'Storefront' menu. The options 'Use Flat Catalog Category' and 'Use Flat Catalog Product' should be switched to 'Yes'.
The Magento cron should pick up the reindexing tasks, however you can run the indexing manually from the command line on the server:
bin/magento indexer:reindexCDN
Using a content delivery network (CDN) is standard practice for many site owners now, with many options, vendors, and services out there.
The CDN will, at a minimum, cache static assets such as images, CSS, and Javascript and serve them to your end-users from a node that is geographically close to them. This has two benefits: it reduces the load on your infrastructure as fewer requests hit the servers directly, and the effect of network latency to your end-users is reduced.
Setting up a CDN depends on the vendor being used, but is usually straightforward. In most cases, you will configure the CDN itself with your website’s URL for where the CDN should look for original assets. You will then configure your Magento site media URL to reference the CDN media domain instead of your base domain.
In some cases you may be able to add a DNS CNAME record to allow a subdomain of your website URL to reference the CDN media domain.
Some services, particularly those that also provide page caching, may work a little differently. Rather than using a specific CDN domain to serve the media assets, these services take over the DNS of your site, and so will cache any valid assets without the need of additional configuration in Magento.
When the first user requests a site asset, the request will be made to the CDN servers. Since the CDN will not have a copy of the asset yet, it will make a request to your server to retrieve the asset. The asset will then be propagated to all nodes within the network, and all subsequent requests from users for the same asset will be served from the CDN and take the load away from your own servers.
One thing you do need to make sure of with Magento Commerce is to ensure that static file signing has been enabled. This adds a timestamp value to the static asset references, and utilises web server rewrites to access the real file on the server. This ensures that a fresh asset is requested after an update has been made and the static content has been regenerated. It is enabled by default in more recent Magento Commerce releases, but may be disabled in earlier versions. To enable it, go to ‘Stores’ => ‘Configuration’ => ‘Advanced’ => ‘Developer’:

Utilisation of a CDN, as well as page caching in Varnish, would prevent anonymous page requests from reaching the Magento Commerce application, as long as they had been cached already. On high-utilisation sites this could yield a significant increase in the number of users able to browse the site at once.
Optimising further
This is just a selection of a few of the things you should do to ensure your site is running well. There are plenty more things you can do to make your site run faster or more optimally.
The Magento sample webserver configuration files contain commented sections that offer more optimal performance when uncommented. Take a look at this, for example. If you’ve used these as the basis of your webserver config you should ensure these sections are uncommented in your production environment.
Utilising an image optimisation extension such as tinyjpg, or a service like Cloudinary, can reduce the amount being downloaded and thus positively impact the site load times.
MySQL-based search is not very flexible and performance is impacted by load on the database. ElasticSearch is available in Enterprise Edition from 2.1 onwards, and other services such as Algolia, or other search extensions that are available for Community Edition, not only provide a more flexible and rich search experience, but can also improve overall site performance by reducing load on the database.