Magento Commerce tutorial: an overview of the Web API
This Magento Commerce tutorial looks at the Web API. Web services are a key feature for integrating your Magento Commerce application with external systems. The changes Magento Commerce has made in this area now make it much easier for developers to create integration points.
This article assumes some familiarity with SOAP and REST, so if you are unfamiliar with either it would help to gain a background understanding before reading on.
Web API changes at a glance
| Magento 1 | Magento Commerce |
|---|---|
| Different feature coverage between SOAP and REST | Same features exposed to SOAP and REST |
| Separate code for SOAP and REST | Same module exposes Magento Commerce service contracts to SOAP and REST |
| Different authentication systems used by SOAP and REST | Compatible token authentication system used by SOAP and REST (OAuth still used by REST only) |
| SOAP WS-I compliance optional | SOAP WS-I compliant only |
| No automatic customer/admin session based authentication | Automatic customer/admin session based authentication |
| No unauthenticated access allowed | Unauthenticated access allowed |
Web API: overview
There were quite a few problems with the Web API in Magento 1, which can be summarised as inconsistency issues for the most part.
The REST API was added in version 1.12 EE (1.7 CE) and only covered a subset of the features of the established SOAP API. Its code was separate too, as were the XML and admin configuration options and the permission levels. Additionally, it had a separate OAuth authentication mechanism, making it a great deal more complex to use than the SOAP API.
The SOAP API also had its quirks, with WS-I compliance being added as an option in the V2 API to make it compatible with Java and .NET implementations. Combined with the deprecated V1 API this meant that by 1.14 EE (1.9 CE) there were three different ways to write a SOAP script.
Magento Commerce has seen an overhaul of the Web API and the theme now is consistency and interoperability. The SOAP and REST APIs have access to the same features, use the same permissions, and can share authentication. Additionally, the SOAP API is now universally WS-I compliant.
Perhaps the biggest change conceptually, however, is the introduction of ‘Integrations’, which are intended to represent third-party integration points. They allow for separate permission allocation and separate authorisation using OAuth. They can be managed in the admin area at System > Integrations. But more on Integrations and OAuth later!
Routes
Defining Web API routes in Magento Commerce is much simpler when compared with Magento 1. The routes are defined in etc/webapi.xml within a module, and although the structure of the definition xml is directed by the requirements of the REST API, the SOAP API uses the same definitions.
Configuration
The following shows the route configuration for fetching a CMS block, as defined in Magento_Cms::etc/webapi.xml:
...
    <route url="/V1/cmsBlock/:blockId" method="GET">
        <service class="Magento\Cms\Api\BlockRepositoryInterface" method="getById"/>
        <resources>
            <resource ref="Magento_Cms::block"/>
        </resources>
    </route>
    ...
In the route tag the url attribute defines the route as /V1/cmsBlock/:blockId where the :blockId part represents an id parameter to be supplied. The method attribute defines the HTTP verb the route uses as ‘GET’ (other available verbs are PUT, POST and DELETE).
In the service tag the class attribute associates the service contract Magento\Cms\Api\BlockRepositoryInterface with the route, and the method attribute defines the method to call upon the object provided by the service contract.
The resources and resource tags are further explained in the permissions section coming up.
Accessing routes
As mentioned above, the configuration is conveniently used by both the REST and SOAP APIs. However, the means of accessing resources differs quite a lot.
The full REST resource URL is the easiest to determine as it just needs prefixing with ‘http://www.yourdomain.com/rest/’, so in the example above, assuming the block needed has an entity id of 1, the resource url would be ‘http://www.yourdomain.com/rest/V1/cmsBlock/1’.
For SOAP the process is a bit more complicated. In Magento 1 the WSDL was a monolithic file, but in Magento Commerce it has been broken down, with a WSDL representing each service contract. You can get a list of available WSDLs at ‘http://www.yourdomain.com/soap/default?wsdl_list’:
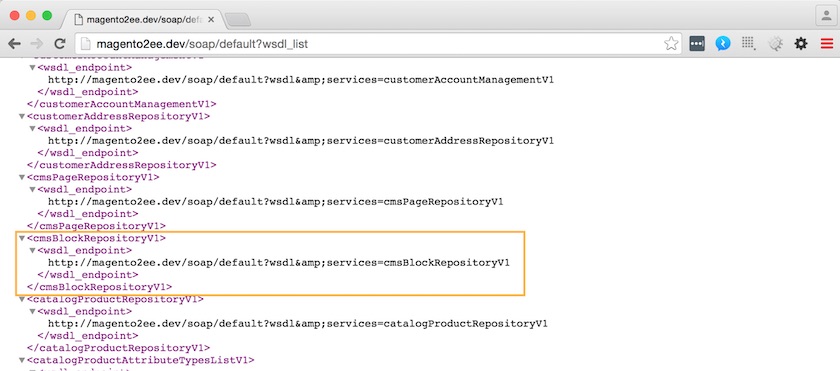
The screenshot shows the WSDL list, with the endpoint URL for the CMS block service highlighted.
If the endpoint http://magento2ee.dev/soap/default?wsdl&services=cmsBlockRepositoryV1 is followed we see the following:
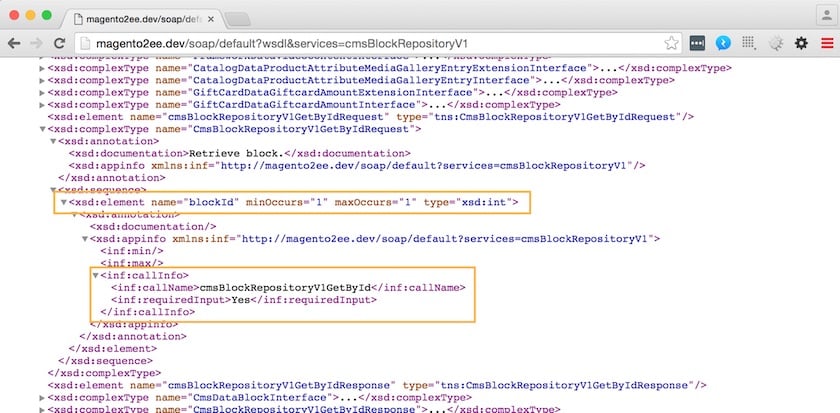
This shows part of the CMS block WSDL with some useful information highlighted in relation to the route configuration discussed above. The bottom highlighted element shows what SOAP call name needs to be used and the top highlighted element shows the parameter required. The usage of this information will be demonstrated in the authentication section below.
REST API route discovery
As you can see in the section above, one of the advantages of the SOAP API is that the WSDL makes it self-documenting. However, in Magento Commerce it is now possible to view all the available REST resources using documentation generated by Swagger UI. If you just need to look at a reference for what is available in the Community Edition (CE) core then visit http://devdocs.magento.com/swagger/index.html.
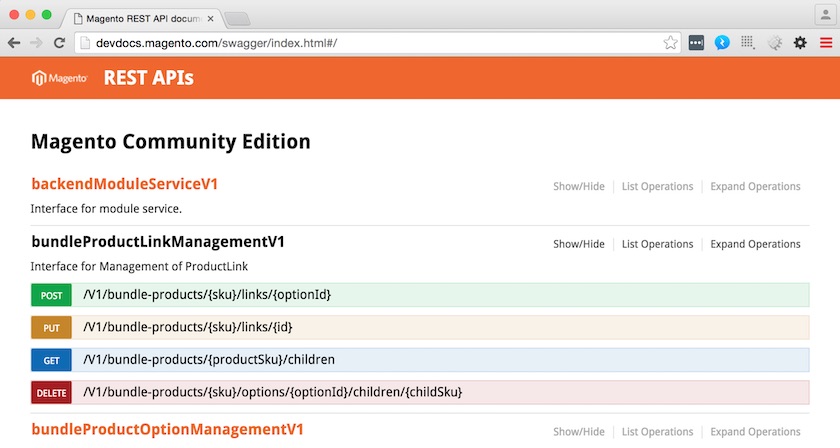
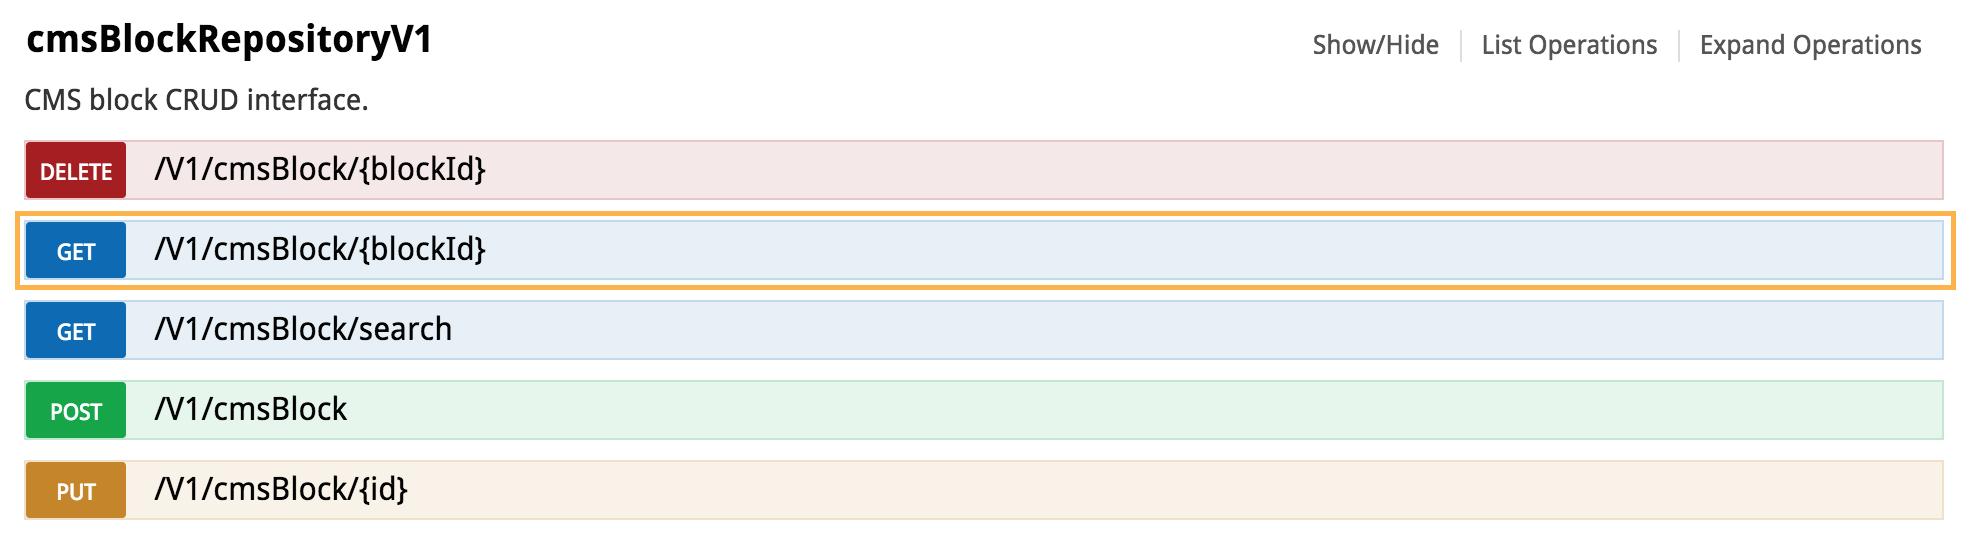
The top screenshot above shows the documentation with a section expanded to show a set of routes related by service contract. Each route can be further expanded to get more information. The screenshot below that shows the CMS block route discussed earlier, along with the additional routes that use the same service contact.
There are situations where you may need to view the available REST resources for your installation, such as when you have added customisations, when the version you are using is behind the latest, or when you are using Enterprise Edition (EE). For this you can get a Swagger UI compatible JSON file by requesting ‘http://www.yourdomain.com/rest/default/schema’.
On its own the JSON is not very accessible, but it’s not too difficult to use git to clone Swagger UI and get it to format the output for you.
First, clone the Swagger UI repo on github to your prefered location (here I’ve just used my home directory), then switch into the dist directory:
> cd ~
> git clone [email protected]:swagger-api/swagger-ui.git
> cd swagger-ui/dist
Then, to avoid cross origin HTTP request issues, we’ll get a copy of the JSON Swagger file:
> curl http://www.yourdomain.com/rest/default/schema -o m2-rest.jsonThen fire up a built-in PHP web server:
> php -S localhost:8081Then, all being well, you should be able enter the URL http://localhost:8081/?url=http://localhost:8081/m2-rest.json into your browser and see the generated documentation:
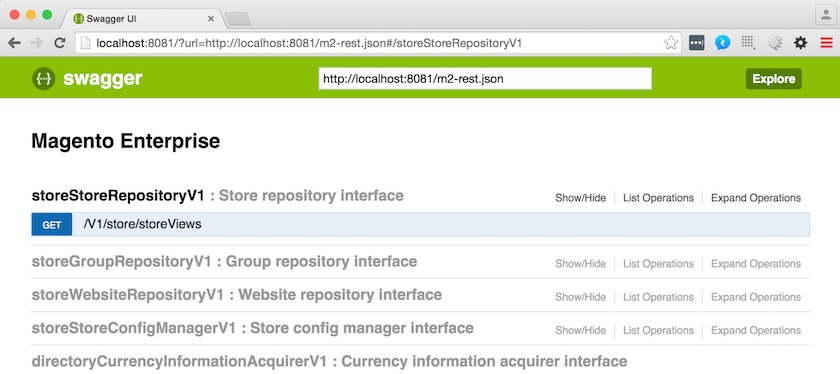
As you can see, the resultant output is very similar to the official documentation described above, but will reflect your local instance instead.
Permissions
Assigned permissions
In Magento Commerce permissions have also been simplified and can be defined and configured in 'etc/acl.xml and etc/webapi.xml' within a module. Permissions defined in this way are assignable to either an admin user role or an Integration using the admin interface.
The following shows the customer ACL permission definition from Magento_Customer::etc/acl.xml:
...
    <acl>
        <resources>
            <resource id="Magento_Backend::admin">
                <resource id="Magento_Customer::customer" title="Customers" sortOrder="40">
                ...
                </resource>
            ...
            </resource>
        </resources>
    </acl>
    ...
This adds a ‘Magento_Customer::customer’ permission to the tree of available permissions, which is presented to an administrator when creating an admin user role or creating an Integration. See Fig. 3 in the ‘Setting up an Integration’ section below for a screenshot of this process.
The following shows the customer route configuration from Magento_Customer::etc/webapi.xml:
...
    <route url="/V1/customers/:customerId" method="GET">
        <service class="Magento\Customer\Api\CustomerRepositoryInterface" method="getById"/>
        <resources>
            <resource ref="Magento_Customer::customer"/>
        </resources>
    </route>
    ...
Within the resources tag is a resource tag, and in that the ref attribute associates the ‘Magento_Customer::customer’ permission with the customer route. Only admin users and Integrations with the Magento_Customer::customer permission assigned will be able to access this.
Assigned permissions are stored in the database tables authorization_role and authorization_rule, which are shared by admin roles and Integrations. Although they are presented in a tree format when they are shown in the admin interface, they are stored in a single column in the authorization_rule table, so when defining them they need to be unique (hence the convention of prefixing with the module name to avoid collisions).
Special permissions
Magento Commerce also introduces two more special permissions which can be referenced in a resource tag, and these are ‘self’ and ‘anonymous’. The following shows these two permissions in Magento_Customer::etc/webapi.xml.
  …
    <route url="/V1/customers/me" method="GET">
        <service class="Magento\Customer\Api\CustomerRepositoryInterface" method="getById"/>
        <resources>
            <resource ref="self"/>
        </resources>
        <data>
            <parameter name="customerId" force="true">%customer_id%</parameter>
        </data>
    </route>
    …
    <route url="/V1/customers" method="POST">
        <service class="Magento\Customer\Api\AccountManagementInterface" method="createAccount"/>
        <resources>
            <resource ref="anonymous"/>
        </resources>
    </route>
    ...
In the example above the ‘self’ permission allows a customer to access the /V1/customers/me route and retrieve information about itself only. In the handling code the PHP session cookie is used to verify that the customer is legitimate and matches the supplied customer_id parameter. Session authentication is discussed further below.
Also, in the example above, the ‘anonymous’ permission, as its name suggests, allows access to the /V1/customers route – even for a user who’s not logged-in. The route is used to create a customer when data is posted to it, so it makes sense that access needs to be open. This might seem like a security risk, but the POST data also requires a valid form key to process the request.
Summary of permissions
The table below summarises user types and the permission types available to them.
| User type | Description | Permission type |
|---|---|---|
| Integration | A third-party application | As assigned to Integration e.g. ‘Magento_Cms::block’. Also ‘self’ or ‘anonymous’. |
| Administrator | A user with an admin account | As assigned to linked admin role e.g. ‘Magento_Cms::page’. Also ‘self’ or ‘anonymous’. |
| Customer | A user with a customer account | ‘self’ or ‘anonymous’ |
| Guest | A user without any account | ‘anonymous’ |
As you can see, permissions cascade, so Integrations and Administrators both have access to Customer and Guest resources, and Customers have access to Guest resources.
Authentication
There are three authentication methods available when using the Web API: token-based, OAuth-based, and session-based. The following table gives an idea of where they get used and whether they can be used by SOAP or REST.
| Authentication type | Purpose | SOAP | REST |
|---|---|---|---|
| Token | Mobile application | Yes | Yes |
| OAuth | Third-party application (integration) | No | Yes |
| Session | Javascript application on the frontend site or admin site | Yes | Yes |
Token authentication
Token authentication can be used with both SOAP and REST. It allows a token to be requested using either an administrator or customer username/password combination. This token is then supplied in subsequent requests in a Authorization HTTP header.
The example below shows what an token Authorization HTTP header looks like:
Authorization: Bearer ifwkyqwg27got0x3h6yyofrhn6kb5wuqThe token request service uses an ‘anonymous’ route to allow an application to make the initial request for a token. This can be seen in Magento_Integration::etc/webapi.xml:
    …
   <route url="/V1/integration/admin/token" method="POST">
        <service class="Magento\Integration\Api\AdminTokenServiceInterface" method="createAdminAccessToken"/>
        <resources>
            <resource ref="anonymous"/>
        </resources>
    </route>
    <route url="/V1/integration/customer/token" method="POST">
        <service class="Magento\Integration\Api\CustomerTokenServiceInterface" method="createCustomerAccessToken"/>
        <resources>
            <resource ref="anonymous"/>
        </resources>
    </route>
    ...
Here we can see two ‘anonymous’ routes set up. The first allows admin user credentials to be supplied to get access permissions at the level assigned to that admin user. The second allows customer credentials to be supplied to get access permission at customer scope level (which gives access to ‘self’ and ‘anonymous’ routes).
Now let’s put all this together and demonstrate how to use tokens practically.
SOAP script using token
Note: the following script has been added to GitHub and annotated to avoid making this tutorial too long!
The following is a link to a basic PHP script that requests a CMS block using token authentication with SOAP: https://github.com/inviqa/inviqa-blog-code-samples/blob/master/magento2/WebApiExample/soap-token-example.php.
Let’s try and break that down to make it easier to understand.
| Reference | Description |
|---|---|
| Lines 4-5 | Define the endpoints for the token service and CMS block service respectively. |
| Lines 6-7 | Define the username and password to be supplied to the token service. |
| Lines 9-13 | Define some basic options to be supplied to the PHP SoapClient. |
| Lines 17-24 | Use the SoapClient to access the anonymous token resource and retrieve a token. |
| Lines 28-32 | Add the bearer token to an ‘Authorization’ header in the SoapClient options. |
| Lines 36-42 | Use the SoapClient to access the CMS block service to retrieve the block content. |
REST script using token
Note: the following script has been added to GitHub and annotated to avoid making this tutorial too long!
And here is a script that does exactly the same thing, using token authentication with REST instead: https://github.com/inviqa/inviqa-blog-code-samples/blob/master/magento2/WebApiExample/rest-token-example.php.
Again, it needs breaking down a bit:
| Reference | Description |
|---|---|
| Line 3 | Link to the composer autoloader, as the script needs to make use of the Zend Http library components. If you are running this script locally you will need to adjust this to point to the vendor directory of your own Magento Commerce install. |
| Lines 5-8 | Load the Zend Http classes needed. |
| Lines 12-13 | Define the endpoints for the token service and CMS block service respectively. |
| Lines 14-15 | Define the username and password to be supplied to the token service. |
| Lines 19-22 | Create a headers object and set the Content-Type to ‘application/json’ so that the REST server knows that JSON will be sent in the request. |
| Lines 23-27 | Create a request object and add the headers object to it. Additionally set the token service URL, set the HTTP verb to POST and add the username and password to the request body in JSON format. |
| Lines 31-42 | Create a client object and use it to send the request and get a response, which contains the token. |
| Lines 46-50 | Create a headers object as above, but crucially the token is added to it in an Authorization header. |
| Lines 51-54 | Create a new request object for the CMS block service and add the headers object. |
| Lines 58-67 | Create a new client object and used to send the request and get a response containing the CMS block content. |
OAuth authentication
OAuth authentication is similar to the token method in that it uses an Authorization HTTP header, but instead of using a bearer token it supplies a more complex arrangement of OAuth tokens.
OAuth authentication is in theory supported for both SOAP and REST. However, in practice SOAP doesn’t seem to work, returning authorisation errors. The official documentation never explicitly says that SOAP isn’t supported but all the OAuth examples use REST.
The example below shows what an OAuth Authorization header looks like:
Authorization: OAuth oauth_consumer_key="vt05sufcppvlxjhl37baqnawk3vx56m4",
oauth_token="cf14inbog1npxp0qro3w20l4onfkpa42",
oauth_signature_method="HMAC-SHA1",
oauth_timestamp="1465992492",
oauth_nonce="PQ86Ob",
oauth_version="1.0",
oauth_signature="ucFj73HF1unYELRaRgVIe5uwDFM%3D"
Setting up an Integration
OAuth authentication is applicable only when working with Integrations. So in order to write a test script using OAuth, an Integration needs to be created with which to interact. The instructions below step through this:
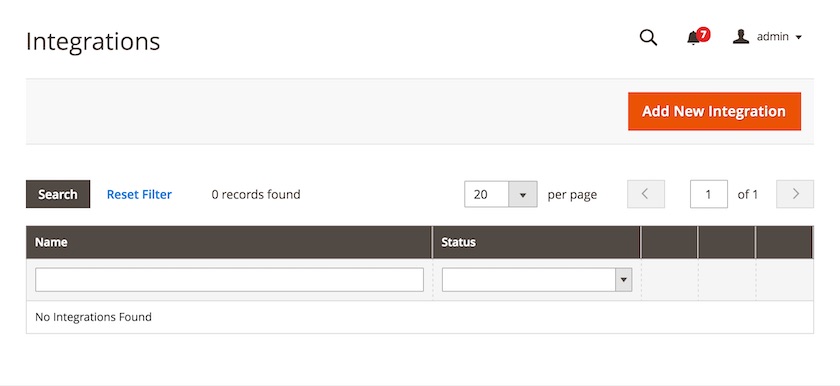
Step 1
Go to System > Integrations and clicking on the ‘Add New Integration’ button.
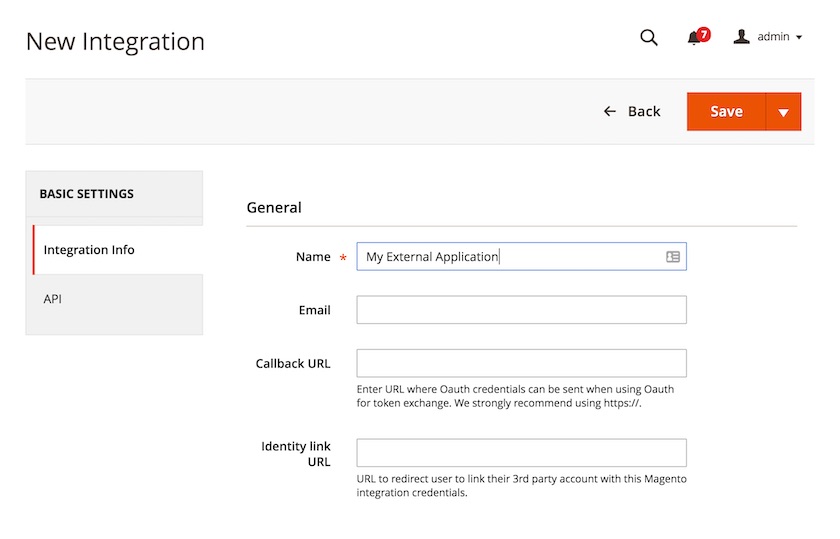
Step 2
Description: You should initially see the default ‘Integration Info’ tab where you need to enter a name for the test Integration.
For a full integration this would be the time to also enter the ‘Callback URL’ and ‘Identity link URL’, however for testing purposes these can be skipped.
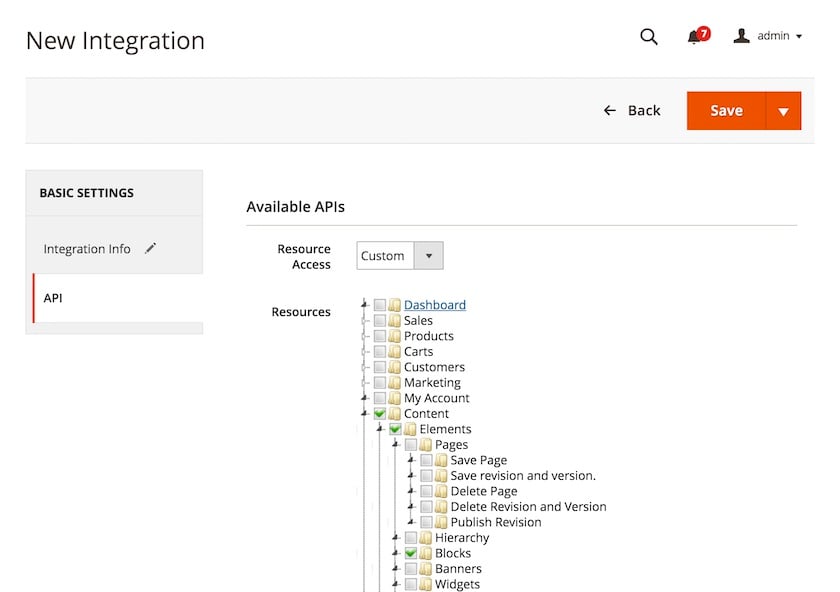
Step 3
Decription: You then need to switch to the ‘API’ tab and select some applicable resources, ensuring, at the very least, that Content > Elements > Blocks is selected.
For a full integration a similar approach should be taken i.e. selecting only the resources that are needed.
Now click the ‘Save’ button.
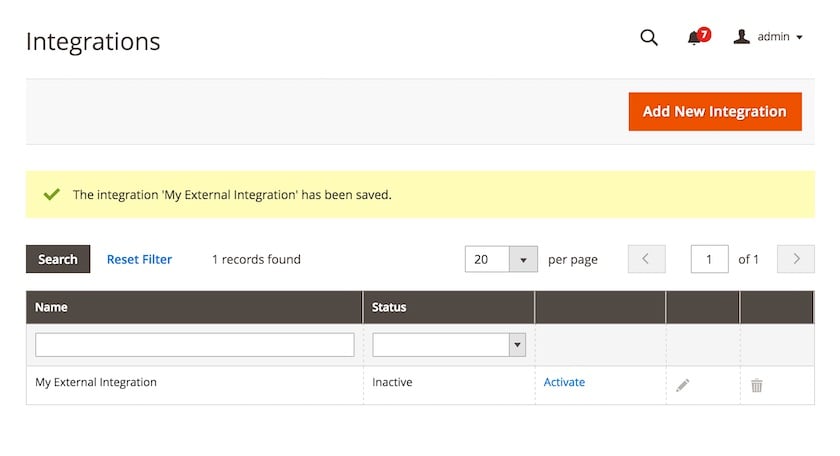
Step 4
You should now see the new Integration listed. However, you will see that the status of the new Integration is ‘Inactive’. To change this (and generate the OAuth access tokens) you need to click ‘Activate’.
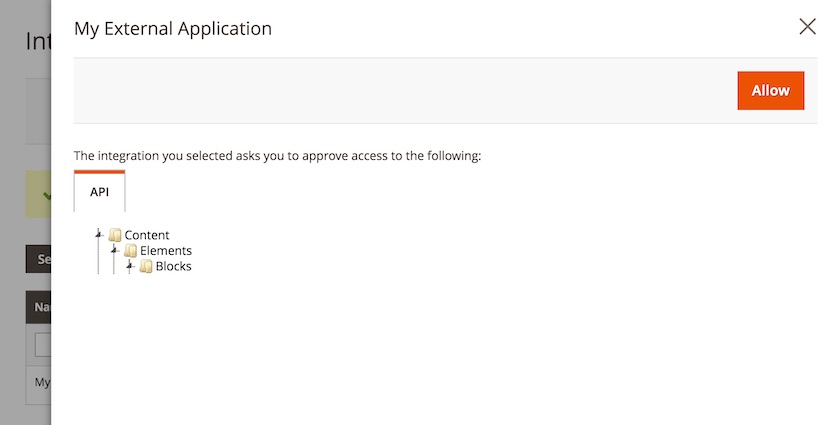
Step 5
This will prompt a modal window asking you to approve the permissions assigned to the Integration. Click the ‘Allow’ button.
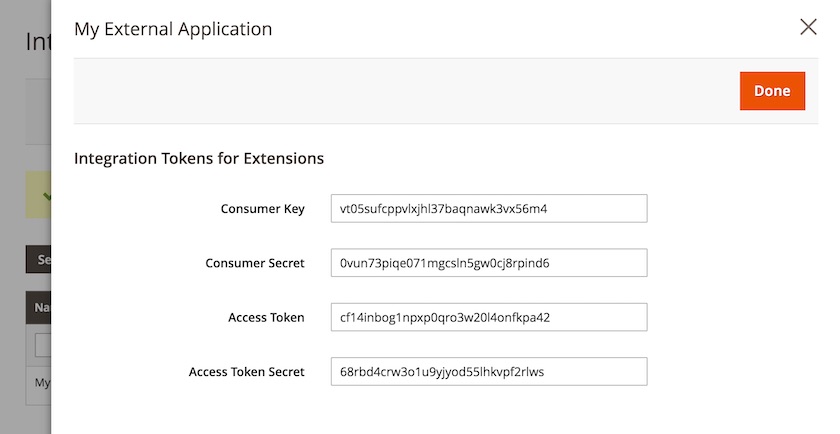
Step 6
This will prompt a further modal displaying the newly generated access tokens. Now click ‘Done’.
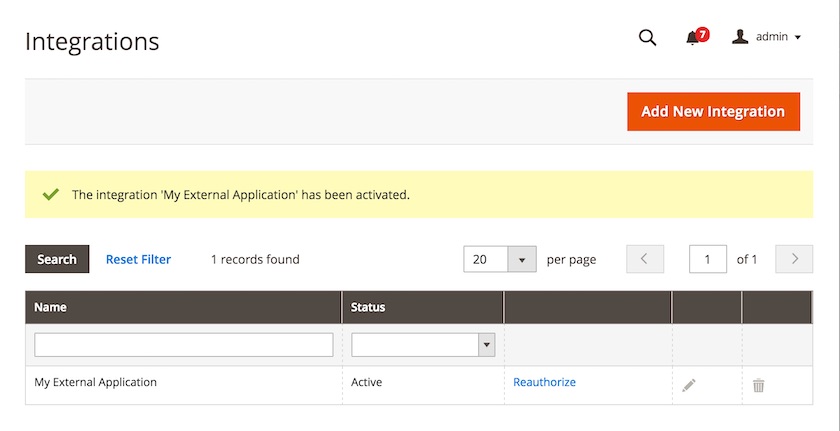
Step 7
The Integration now has a status of ‘Active’ and is ready to use.
If you didn’t capture the access tokens in the screen above, you can view them again by editing the Integration.
REST script using OAuth
Note: the following script has been added to GitHub and annotated to avoid making this tutorial too long!
With an Integration now set up, here is a script that does the same thing as the token authentication scripts, using OAuth authentication with REST instead: https://github.com/inviqa/inviqa-blog-code-samples/blob/master/magento2/WebApiExample/rest-oauth-example.php.
Again, it needs breaking down a bit. To avoid repetition, lines similar to the REST script in the previous section will not be annotated.
| Reference | Description |
|---|---|
| Lines 5-7 | Load the OAuth classes needed. |
| Lines 17-24 | Define the values needed by OAuth, including the token values generated when creating the Integration above. |
| Lines 28-35 | Assign OAuth values into a params array. |
| Lines 37-43 | Generate OAuth signature. |
| Line 44 | Add signature to params array. |
| Lines 48-58 | Create a headers object using the params array to generate an OAuth Authorization header. |
| Lines 62-65 | Create a new request object for the CMS block service and add the headers object. |
| Lines 69-78 | Create a new client object and used to send the request and get a response containing the CMS block content. |
Session authentication
Session authentication uses the PHP session to determine if the request has originated from a browser where a customer is logged in, and as such no Authorization HTTP header needs to be sent.
Session authentication is supported for both SOAP and REST. However, in practice REST is the more convenient option, and this is reflected in the core code where only REST is used.
The main purpose of session authentication is to allow Javascript widgets to be able to easily get information about the application.
Below is an example of a route that will return details of the currently logged in customer.
<route url="/V1/customers/me" method="GET">
        <service class="Magento\Customer\Api\CustomerRepositoryInterface" method="getById"/>
        <resources>
            <resource ref="self"/>
        </resources>
        <data>
            <parameter name="customerId" force="true">%customer_id%</parameter>
        </data>
    </route>
As you can see, it uses ‘self’ in relation to the resource which means it will have session level authentication. The route uses the word ‘me’ to further distinguish it as a customer specific route (the convention is to use either ‘me’ or ‘mine’ in these routes).
You can very easily use cURL to emulate your browser to see the session authentication in action. The only prerequisite is to log in to your Magento Commerce instance and get hold of the PHPSESSID cookie value:
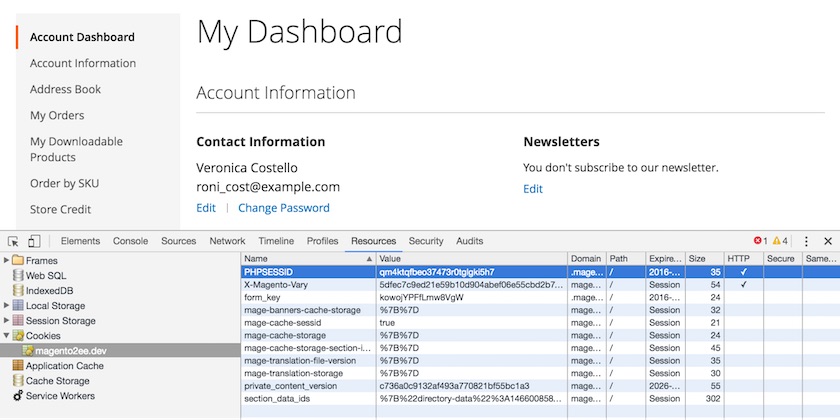
In the screenshot above I’ve logged in with the default Magento Commerce user and have used the dev tools to find the PHPSESSID, which has a value of ‘qm4ktqfbeo37473r0tglgki5h7’.
Then from the command line, the following command can be run:
> curl 'http://magento2ee.dev/rest/default/V1/customers/me' \
-H 'Cookie:  PHPSESSID=qm4ktqfbeo37473r0tglgki5h7;' \
-H 'Content-Type: application/json' \
-H 'X-Requested-With: XMLHttpRequest'
If the session is still active, a JSON dataset for the customer should be returned:
{
   "id":1,
   "group_id":1,
   "default_billing":"1",
   "default_shipping":"1",
   "created_at":"2016-03-07 16:27:58",
   "updated_at":"2016-03-07 16:27:59",
   "created_in":"Default Store View",
   "dob":"1973-12-15",
   "email":"[email protected]",
   "firstname":"Veronica",
   "lastname":"Costello",
   "gender":2,
   "store_id":1,
   "website_id":1,
   "addresses":[
      ...
   ]
}