Magento 2 tutorial: message queues
This Magento 2 (now known as Magento Commerce/Magento Open Source) tutorial looks at message queues in Magento 2, and specifically the built-in support in the Enterprise Edition (EE). Please note that the functionality discussed is not available natively in Community Edition (CE).
The article assumes familiarity with RabbitMQ, so you may need to get a background understanding before reading any further. The best place to start is RabbitMQ itself which has several tutorials which walk you through the concepts of creating message queues:
The article also assumes that you have installed and configured RabbitMQ. It is also useful (but not essential) to enable the web interface to monitor your RabbitMQ server. This is available with the management plugin.
I’ll be discussing how to configure and build message queues in Magento 2. Then I’ll demonstrate how to create the message queue topology using one of the examples in the tutorials referenced above. I’ll then run through the process of creating a Magento module to publish and subscribe to a message queue. Note that all the code I use in my examples is available on GitHub.
Code points
The message queue code is located in a few different modules, which can make it difficult to navigate the code at first. However, each module has a distinct purpose:
| Module | Description |
|---|---|
| magento/framework-message-queue | Contains abstract message queue code that's shared by all implementations. |
| magento/module-message-queue | Contains the code needed ro list and run consumers. |
| magento/module-mysql-mq | Contains the code to create a databse adaptor – adaptor identified as db |
| magento/module-amqp | Contains the code to create a AMQP adaptor i.e. a RabbitMQ adaptor – adaptor identified as amqp |
Queue configuration
As you might expect with Magento, the approach to creating a message queue is driven by the XML configuration. The key configuration files are summarised below:
| File | Description |
|---|---|
| <module>/etc/communication.xml | Contains a list of topics and handlers. Intended to contain message queue information shared between implementations. Elements:
|
| <module>/etc/queue.xml | Contains a list of message brokers with queue and consumer definitions. Contains implementation specific information i.e. defines whether Elements:
|
The Magento 2 documentation already does a good job of describing the topic/handler and broker/queue elements and their attributes. So to avoid repeating that information here, this article will instead show how they are used by example.
Connection adaptors
As you can see from the table in the ‘Code Points’ section above, two adaptors are provided by default.
Database adaptor
The database adaptor is a basic implementation which stores messages in tables and uses cron to trigger the collection of the messages. Below is a summary of the tables:
| Table | Description |
|---|---|
| queue | Contains a list of queues |
| queue_message | Contains message data in JSON format. |
| queue_message_status | Contains status entries in relation to the queue_message table. Status mapping as follows: 2 = new |
The installer scripts create the basic tables and insert entries into the queue table according to the latest queue configuration.
As of version 2.1, there is no facility to keep the queue table in sync with the queue configuration, although this should be solved in a future release by converting the data installer script to a recurring installer script, as that change has already been made to the AMQP adaptor module.
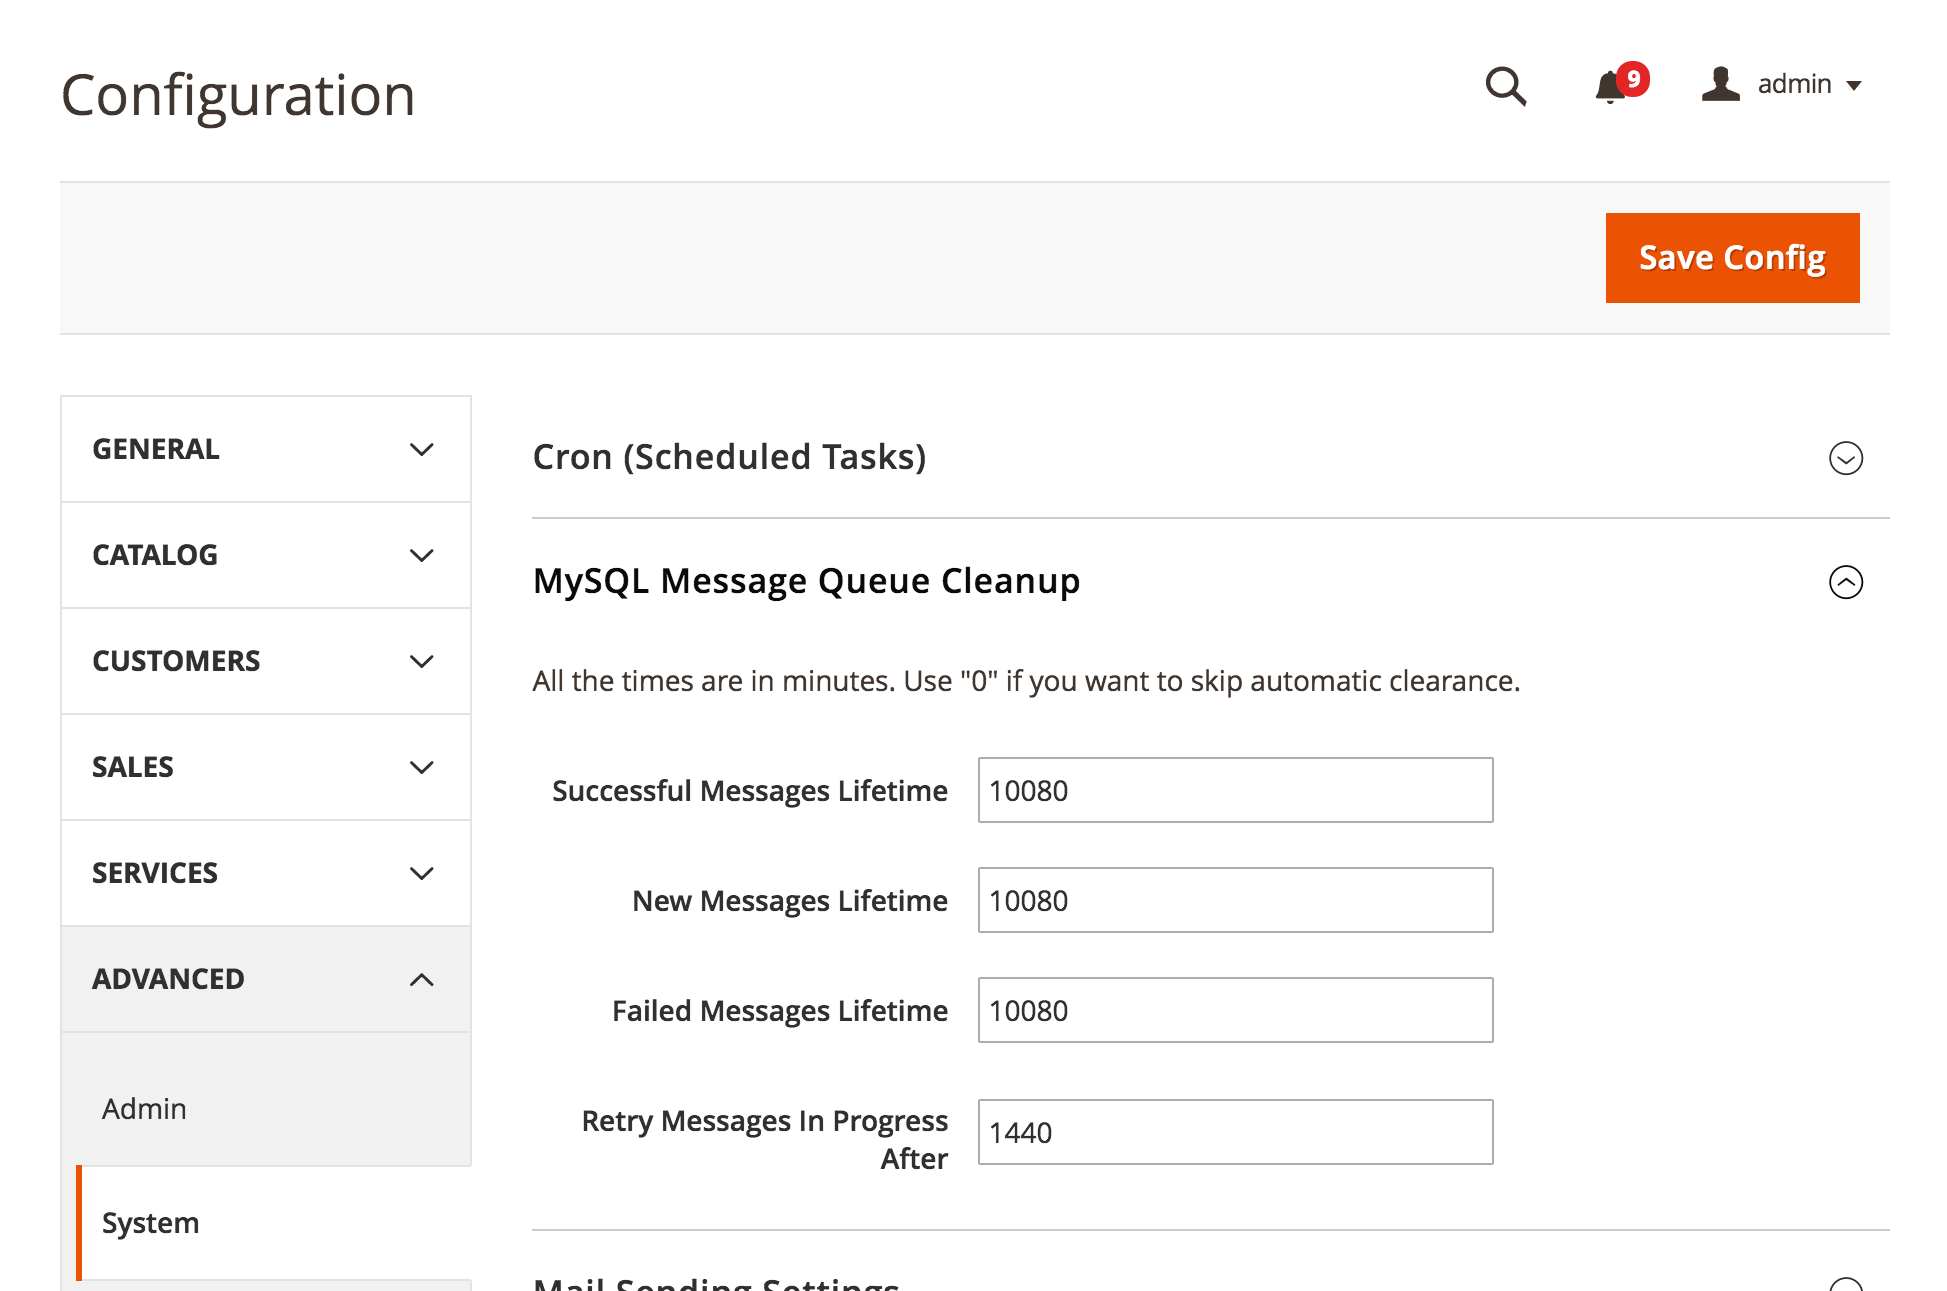
The database adapter module also introduces functionality to clean up or retry messages after certain time intervals. These settings can be found in Stores > Configuration > Advanced > System > MySQL Message Queue Cleanup. Below is a screenshot of the available settings.
AMQP adaptor
The AMQP adaptor defers the message handling to a AMQP compatible application, such as RabbitMQ. As such it does not require the additional tables and cleanup functionality of the database adaptor.
Instead of creating database tables the installer scripts create the necessary exchanges, queues, consumers and bindings in RabbitMQ according to the latest queue configuration. These are kept up-to-date by using a recurring installer script, which means that any changes to configuration in queue.xml are transposed to RabbitMQ when running the Magento cli tool with command magento setup:upgrade.
Default exchange
By default Magento creates a single topic exchange called magento which can be used in the queue.xml configuration.
...
    <broker topic="orange" type="amqp" exchange="magento">
        ...
    </broker>
    <broker topic="green" type="db" exchange="magento">
        ...
    </broker>
...
Direct exchange configuration example
The following is a slightly modified diagram from the fourth RabbitMQ tutorial. It represents the topology of a direct exchange.
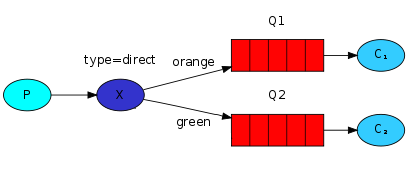
This can be represented in Magento using the following configuration in etc/communication.xml:
...
    <topic name="orange" request="Inviqa\MessageQueueExample\Api\MessageInterface" />
    <topic name="green" request="Inviqa\MessageQueueExample\Api\MessageInterface" />
...
And the following configuration in etc/queue.xml:
...
    <broker topic="orange" type="amqp" exchange="magento">
        <queue consumer="consumerOne" name="queueOne" handler="Inviqa\MessageQueueExample\Model\Subscriber::processMessage" consumerInstance="Magento\Framework\MessageQueue\Consumer"/>
    </broker>
    <broker topic="green" type="amqp" exchange="magento">
        <queue consumer="consumerTwo" name="queueTwo" handler="Inviqa\MessageQueueExample\Model\Subscriber::processMessage" consumerInstance="Magento\Framework\MessageQueue\Consumer"/>
    </broker>
...
This is hopefully self-explanatory for the most part. The two key things to note however are:
- The
requestattribute of thetopicelement: this specifies the data structure that’s used to define a message and is needed when publishing any messages through Magento - The
handlerattribute of thebrokerelement: this specifies the class and method that the Magento consumer will pass a message to when it is sent from a queue
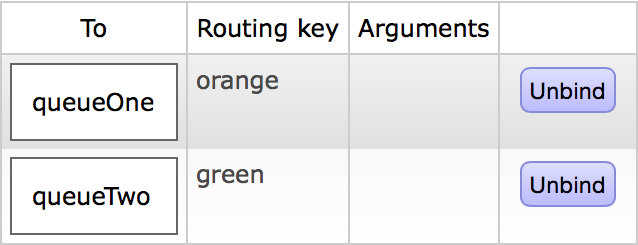
Once installed by running magento setup:upgrade, this should create the following bindings in the magento exchange:
If you are wondering why such a basic topology has been used, the answer is that this is the limit of the complexity of what can be achieved since configuration changes were introduced in version 2.1.
In earlier 2.0 versions, the configuration (although not perfect) was more flexible and allowed multiple bindings and wildcard binding, thus giving greater access to the features of a topic exchange.
In version 2.1, this flexibility was removed in favour of a simpler approach. The 2.0 version of the documentation shows what was previously possible.
Publishing messages
Once a queue and bindings have been set up, the next step is to publish a message. This can be demonstrated by adding a publish command to the Magento cli tool, which the following code will work towards.
The screenshot below shows the layout of the file structure that will be used:
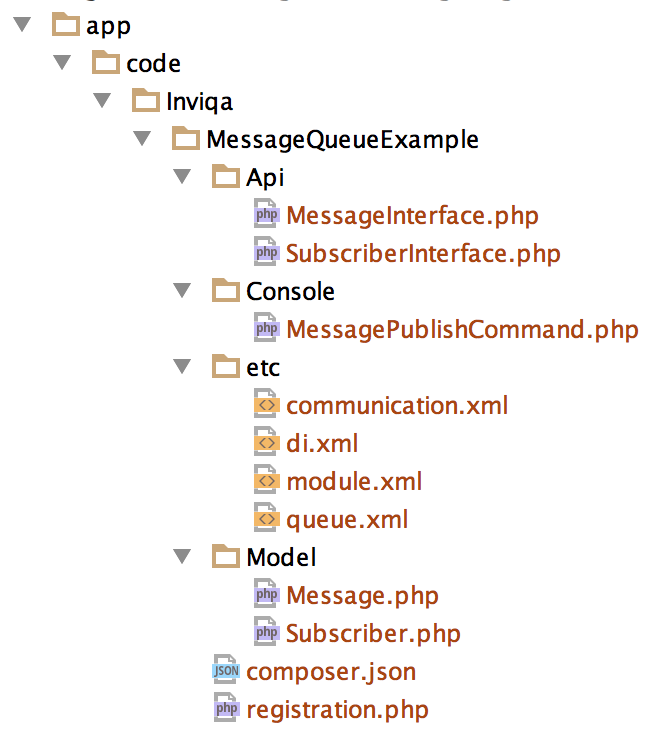
The first thing to create in the module folder is the configuration file etc/communication.xml and etc/queue.xml. For this example the direct exchange configuration (see above) will be used.
The next thing that needs creating is a service contract to transport the messages. This is defined in the above configuration in the schema attribute of the topic element as Inviqa\MessageQueueExample\Api\MessageInterface. Magento will therefore look for an interface at Api/MessageInterface.php in the module folder:
<?php

namespace Inviqa\MessageQueueExample\Api;

interface MessageInterface
{
    /**
     * @param string $message
     * @return void
     */
    public function setMessage($message);

    /**
     * @return string
     */
    public function getMessage();
}
This simple interface defines two methods that need to be implemented that get and set a string message.
The implementation needs to be created in Model/Message.php:
<?php

namespace Inviqa\MessageQueueExample\Model;

use Inviqa\MessageQueueExample\Api\MessageInterface;

class Message implements MessageInterface
{
    /**
     * @var string
     */
    protected $message;

    /**
     * {@inheritdoc}
     */
    public function getMessage()
    {
        return $this->message;
    }

    /**
     * {@inheritdoc}
     */
    public function setMessage($message)
    {
        return $this->message = $message;
    }
}
This class implements the methods in MessageInterface, storing the message in an instance variable.
Then in etc/di.xml, the following needs adding:
...
<preference for="Inviqa\MessageQueueExample\Api\MessageInterface" type="Inviqa\MessageQueueExample\Model\Message" />
...
This configures Magento to return an instance of the Message model whenever the MessageInterface service contract is requested.
Next the console command can be added by creating Console/MessagePublishCommand.php:
<?php

namespace Inviqa\MessageQueueExample\Console;

use Symfony\Component\Console\Command\Command;
use Symfony\Component\Console\Input\InputArgument;
use Symfony\Component\Console\Input\InputInterface;
use Symfony\Component\Console\Output\OutputInterface;
use Magento\Framework\MessageQueue\PublisherInterface;
use Inviqa\MessageQueueExample\Api\MessageInterface;

class MessagePublishCommand extends Command
{
    const COMMAND_QUEUE_MESSAGE_PUBLISH = 'queue:message:publish';
    const MESSAGE_ARGUMENT = 'message';
    const TOPIC_ARGUMENT = 'topic';

    /**
     * @var PublisherInterface
     */
    protected $publisher;

    /**
     * @var string
     */
    protected $message;

    /**
     * {@inheritdoc}
     */
    public function __construct(
        PublisherInterface $publisher,
        MessageInterface $message,
        $name = null
    ) {
        $this->publisher = $publisher;
        $this->message = $message;
        parent::__construct($name);
    }

    /**
     * {@inheritdoc}
     */
    protected function execute(InputInterface $input, OutputInterface $output)
    {
        $message = $input->getArgument(self::MESSAGE_ARGUMENT);
        $topic = $input->getArgument(self::TOPIC_ARGUMENT);

        try {
            $this->message->setMessage($message);
            $this->publisher->publish($topic, $this->message);
            $output->writeln(sprintf('Published message "%s" to topic "%s"', $message, $topic));
        } catch (\Exception $e) {
            $output->writeln($e->getMessage());
        }
    }

    /**
     * {@inheritdoc}
     */
    protected function configure()
    {
        $this->setName(self::COMMAND_QUEUE_MESSAGE_PUBLISH);
        $this->setDescription('Publish a message to a topic');
        $this->setDefinition([
            new InputArgument(
                self::MESSAGE_ARGUMENT,
                InputArgument::REQUIRED,
                'Message'
            ),
            new InputArgument(
                self::TOPIC_ARGUMENT,
                InputArgument::REQUIRED,
                'Topic'
            ),
        ]);
        parent::configure();
    }
}
This looks like a lot of code, so needs to be broken down a bit.
<?php

namespace Inviqa\MessageQueueExample\Console;

use Symfony\Component\Console\Command\Command;
use Symfony\Component\Console\Input\InputArgument;
use Symfony\Component\Console\Input\InputInterface;
use Symfony\Component\Console\Output\OutputInterface;
use Magento\Framework\MessageQueue\PublisherInterface;
use Inviqa\MessageQueueExample\Api\MessageInterface;
...
Here the classes that will be needed by the console command are imported, including the MessageInterface created above and the framework message queue PublisherInterface.
...
class MessagePublishCommand extends Command
{
    const COMMAND_QUEUE_MESSAGE_PUBLISH = 'queue:message:publish';
    const MESSAGE_ARGUMENT = 'message';
    const TOPIC_ARGUMENT = 'topic';

    /**
     * @var PublisherInterface
     */
    protected $publisher;

    /**
     * @var string
     */
    protected $message;

    /**
     * {@inheritdoc}
     */
    public function __construct(
        PublisherInterface $publisher,
        MessageInterface $message,
        $name = null
    ) {
        $this->publisher = $publisher;
        $this->message = $message;
        parent::__construct($name);
    }


}
...
Here the class is created and some class constants are defined to avoid duplication. Then the PublisherInterface and MessageInterface are injected into the constructor.
...
    protected function execute(InputInterface $input, OutputInterface $output)
    {
        $message = $input->getArgument(self::MESSAGE_ARGUMENT);
        $topic = $input->getArgument(self::TOPIC_ARGUMENT);

        try {
            $this->message->setMessage($message);
            $this->publisher->publish($topic, $this->message);
            $output->writeln(sprintf('Published message "%s" to topic "%s"', $message, $topic));
        } catch (\Exception $e) {
            $output->writeln($e->getMessage());
        }
    }
...
Here the execute method is overidden from the parent to provide the main functionality. The message and topic arguments are retrieved from the console input, added to the message transport, then the transport is published to the topic. Additionally a message is written to the output to describe the action. If an exception is thrown by the publisher that is written to output instead.
...
    /**
     * {@inheritdoc}
     */
    protected function configure()
    {
        $this->setName(self::COMMAND_QUEUE_MESSAGE_PUBLISH);
        $this->setDescription('Publish a message to a topic');
        $this->setDefinition([
            new InputArgument(
                self::MESSAGE_ARGUMENT,
                InputArgument::REQUIRED,
                'Message'
            ),
            new InputArgument(
                self::TOPIC_ARGUMENT,
                InputArgument::REQUIRED,
                'Topic'
            ),
        ]);
        parent::configure();
    }
...
This method extends the parent configure method to define how the command should be run. setName sets the command name to queue:message:publish and setDescription sets a description of what the command will do. These will appear in the list of commands when running magento list. setDefinition defines the input arguments required, which in this case are a message and a topic.
The command can be added to the configuration by inserting the following into etc/di.xml:
...
    <type name="Magento\Framework\Console\CommandList">
        <arguments>
            <argument name="commands" xsi:type="array">
                <item name="publish-message" xsi:type="object">Inviqa\MessageQueueExample\Console\MessagePublishCommand</item>
            </argument>
        </arguments>
    </type>
...
At this point magento setup:upgrade will need to be run to ensure Magento knows about the new files. Then, if all is working as expected, the command should now be available to use:
> magento list | grep "queue:"
 queue:consumers:list            List of MessageQueue consumers
 queue:consumers:start           Start MessageQueue consumer
 queue:message:publish           Publish a message to a topic
> magento queue:message:publish -h
Usage:
 queue:message:publish message topic

Arguments:
 message               Message
 topic                 Topic
The command can then be executed to send a message to the message queue:
> magento queue:message:publish "Orange" "orange"
Published message "Orange" to topic "orange"
> magento queue:message:publish "Green" "green"
Published message "Green" to topic "green"
This should result in the following in the RabbitMQ web interface:

The screenshot shows that (as expected) there is one message ready in queueOne and one message ready in queueTwo.
If an attempt is made to publish to a topic that isn’t defined in etc/communication.xml the following error will occur:
> magento queue:message:publish "Test not defined" "notdefined"
Specified topic "notdefined" is not declared.
This is a limitation imposed by Magento rather than RabbitMQ. If the topic is not predefined it will throw an exception. This is contrary to the default behaviour of RabbitMQ which allows messages to be published to any topic (within limitations) but will discard the message if there are no matching bindings.
Running consumers
So far the focus has been on creating the correct configuration and then publishing a message using the Magento message queue publisher. To receive and process messages that are in a queue a consumer must be running to listen for any new messages. This can be done using the cli tool and is described below.
However, before running the consumer, it needs to know how to process a message it is given. Referring back to the queue configuration above, the queue is configured to use Inviqa\MessageQueueExample\Api\SubscriberInterface::processMessage. So an interface needs creating at Api/SubscriberInterface.php in the module folder:
<?php

namespace Inviqa\MessageQueueExample\Api;

use Inviqa\MessageQueueExample\Api\MessageInterface;

interface SubscriberInterface
{
    /**
     * @return void
     */
    public function processMessage(MessageInterface $message);
}
This simple interface defines a single method that need to be implemented to process a message. It is essential that the message uses the same format/class as when it was published. In this case it is expecting a MessageInterface derived class.
The implementation of SubscriberInterface needs to be created in Model/Subscriber.php:
<?php

namespace Inviqa\MessageQueueExample\Model;

use Magento\Framework\Model\AbstractModel;
use Inviqa\MessageQueueExample\Api\MessageInterface;
use Inviqa\MessageQueueExample\Api\SubscriberInterface;

class Subscriber implements SubscriberInterface
{
    /**
     * {@inheritdoc}
     */
    public function processMessage(MessageInterface $message)
    {
        echo 'Message received: ' . $message->getMessage() . PHP_EOL;
    }
}
This class implements the processMessage method in SubscriberInterface, and just echos out the message (for demonstration purposes).
Then in etc/di.xml, the following needs adding:
...
<preference for="Inviqa\MessageQueueExample\Api\SubscriberInterface" type="Inviqa\MessageQueueExample\Model\Subscriber" />
...
Then, magento setup:upgrade needs running again, and it should now be possible to run the consumers (in separate tabs):
> magento queue:consumers:list
consumerOne
consumerTwo
> magento queue:consumers:start consumerOne
Message received: Orange
> magento queue:consumers:list
consumerOne
consumerTwo
> magento queue:consumers:start consumerTwo
Message received: GreenHere the consumers are started and each pick up the messages that have been routed to their respective queues and output them to the terminal. The consumers need to be run in separate terminals because, unlike other commands in the cli tool, once they are started they will run until they are explicitly cancelled into the terminal. This gives a clue as to how they are intended to be used in a production environment i.e. each consumer will need to be run as a background process, possibly supported by something like Supervisor.