Magento Commerce tutorial: store management essentials
This guide will provide you with the essential knowledge required to set up a simple ecommerce store with Magento Commerce. W'll be looking at configuration via the Magento Commerce administration panel in particular.
Many of you will have had experience with either Magento 1 or another ecommerce platform, and therefore will quickly recognise the terminology and concepts used in this guide.
However, if you are new to both Magento and ecommerce in general, we have included a glossary at the end of this guide to help explain the various expressions and concepts introduced in this guide.
This guide will assume that you have the following available:
- A Magento Commerce CE or EE instance installed either locally or with a web host
- Basic knowledge of ecommerce
- Basic knowledge of using a content management system (CMS)
Lastly, a quick disclaimer: please note that this guide was first published ahead of Magento Commerce General Availability and therefore may be subject subject to amendments.
1. Navigating the administration
One of the most significant updates to Magento in its second edition is the administration panel, which has been greatly improved.
The main navigation has been redesigned vertically on the left hand side, and will display a sub-navigation upon click. This new administration system and navigation is touch-friendly and responsive so you can access it on your tablet or mobile device.
If you’ve previously used Magento 1.X then the new Magento Commerce navigation in the administration may take some time to get used to, but it is a considerable improvement.
The navigation is now structured in a more intuitive way, making it easier for admins to manage their online store(s).
General Configuration
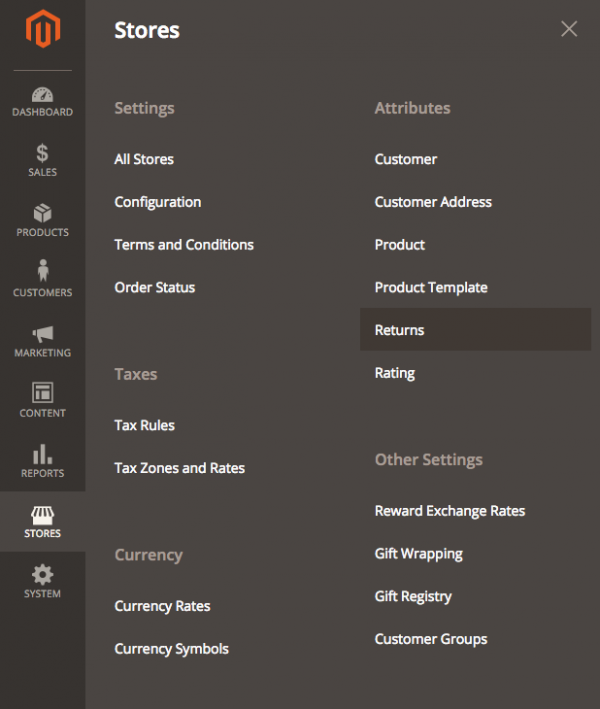
The Configuration section within the Magento Commerce administration allows you to configure details such as your company information, domain, payment details, and shipping cost. You can find the Configuration section within Store under the Settings section.
At first sight, the panel may seem overwhelming, with a comprehensive set of configurations seemingly required in order to get going with your store. However, only a few of the settings are essential to begin selling your products and/or services online. In this guide we’ll concentrate on these settings, and leave the more in-depth configurations for another time. This means that we’ll focus on the General and Sales sections of the Configuration.
The Configuration section within Magento allows you to alter settings on up to 4 levels – Global, Website, Store, and Store view. For simplicity, we’ll set up a simple transactional website with just one store.
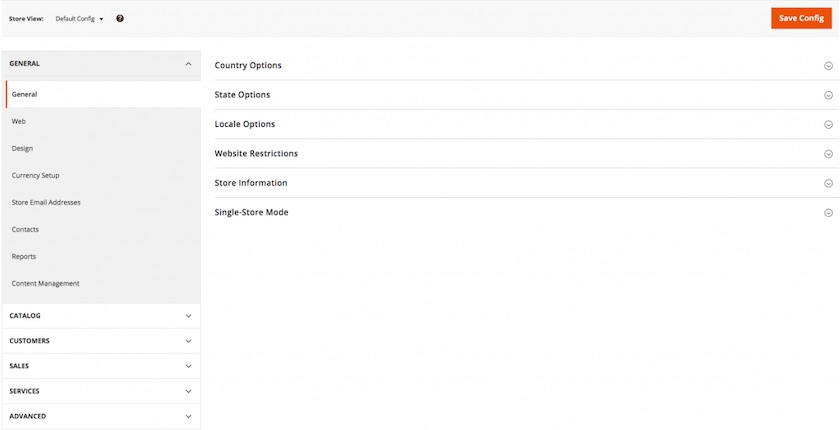
When you first land on the Configuration section you’ll see the General section open, which is where we’ll start.
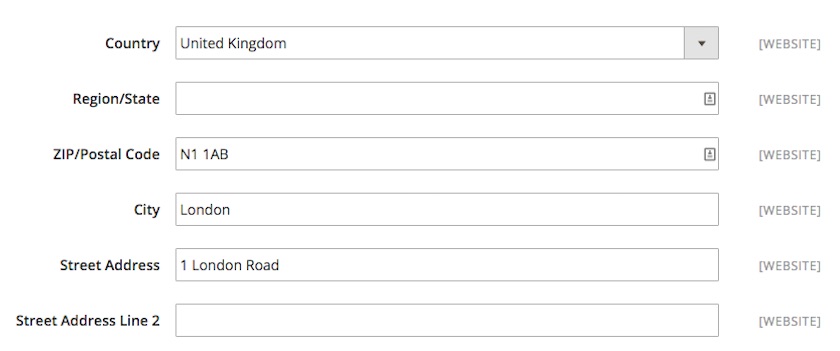
Under Country Options set the Default Country, e.g. United Kingdom. You can also set the countries from which you will allow purchases under Allow Countries. By default all countries are selected.
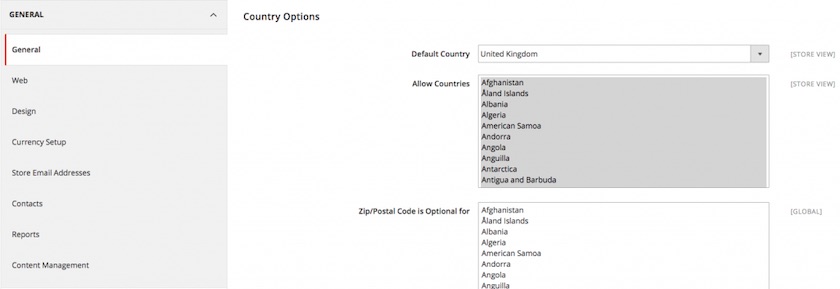
In the same section you’ll find the sub-header Store Information, which is where you should enter your company details.
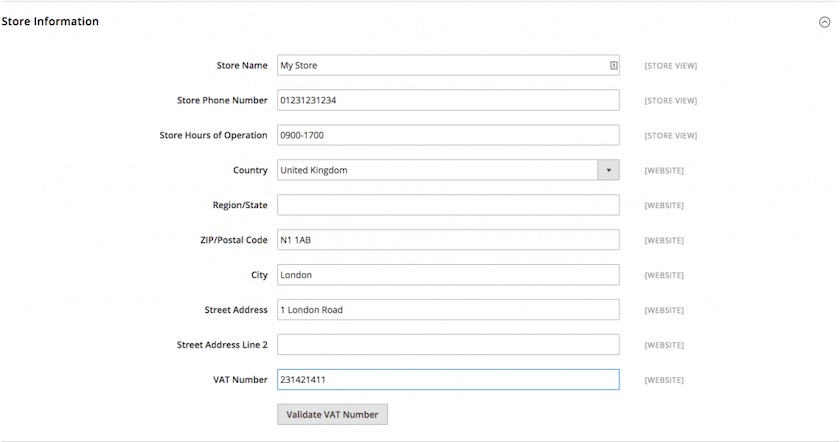
That’s it, but before we move on remember to click Save Config.
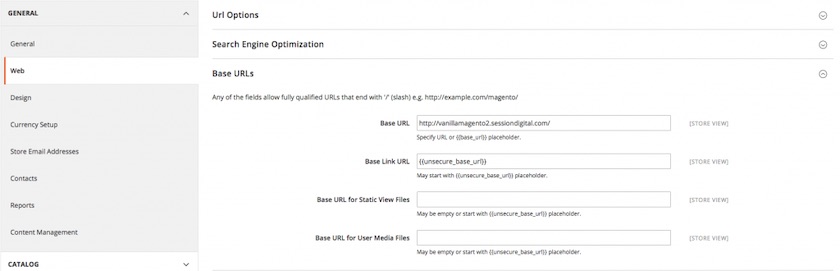
Web and URLs
Next we’ll move onto the Web sub-menu on your left, where we’ll look at some basic settings around URLs. Set the Base URL, which will be your domain (this may already have been set when you installed Magento).
If you have an SSL certificate for your site (highly recommended), set the Secure Base URL, which will be the same as your domain. However, it will have https:// rather than http:// (this may already have been set when you installed Magento).
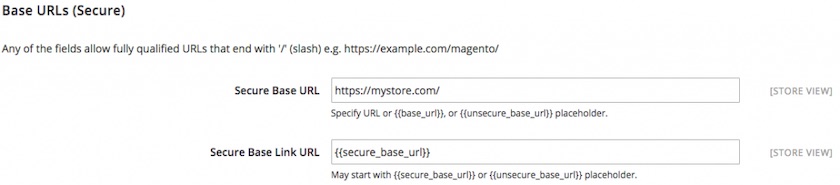
If you have an SSL certificate for your site, set both Use Secure URLs on Storefront and Use Secure URLs in Admin to Yes.

Don’t forget to click Save Config before you move on.
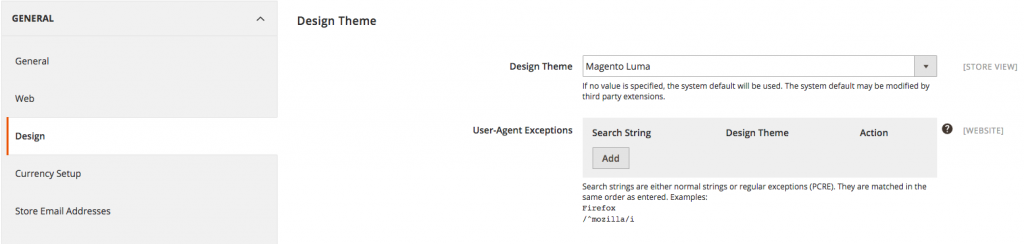
Design
Next we’ll look at the Design sub-menu on your left where you can set your site theme and logo amongst other things. Under Design Theme you can set your chosen design (e.g. if you’ve got a theme developed or have bought a pre-built theme). Magento Commerce offers a native responsive theme, so you can easily get started.
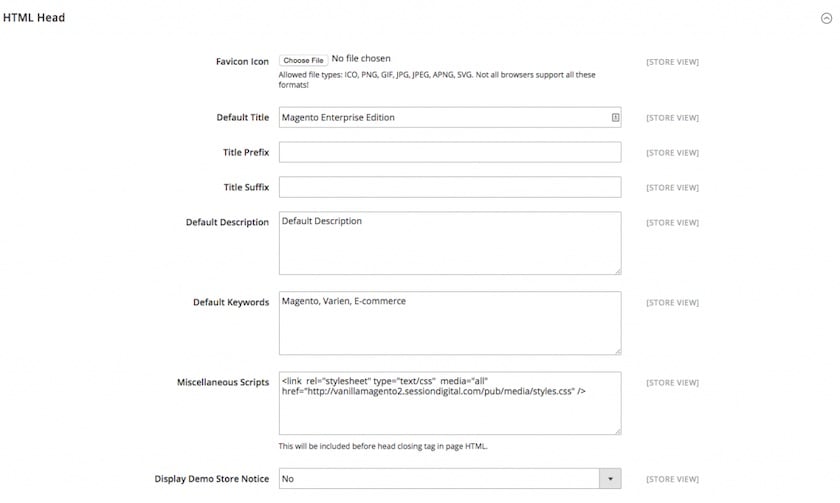
Under HTML Head you can upload your favicon and set the default title of your store, as well as some default metadata for your site.
SEO
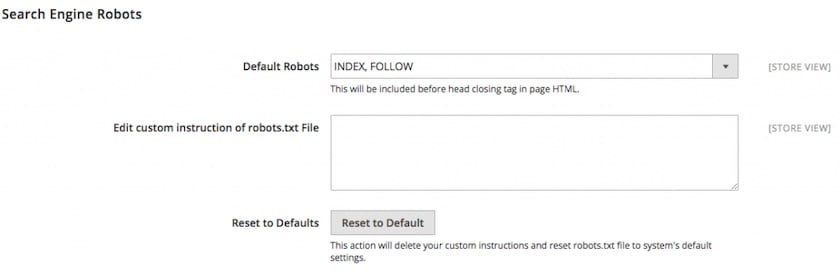
Under Search Engine Robots, ensure the Default Robots is set to Index, Follow. This is so that search engines will index your website.
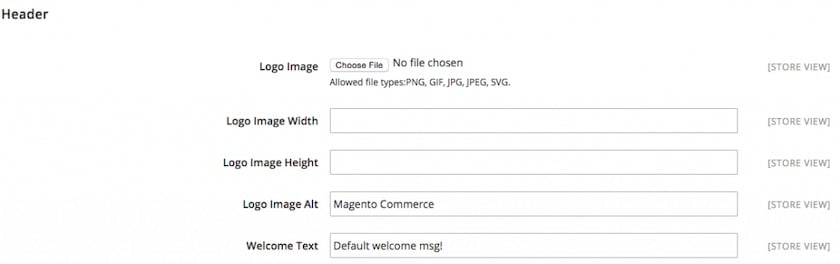
In the Header section you can upload your Logo Image and set its width and height as well as alt text for the logo.
Under Footer you can ensure the footer details are tailored to your business. For example: Copyright © 2015 Fantastic T-shirts Ltd. All rights reserved.

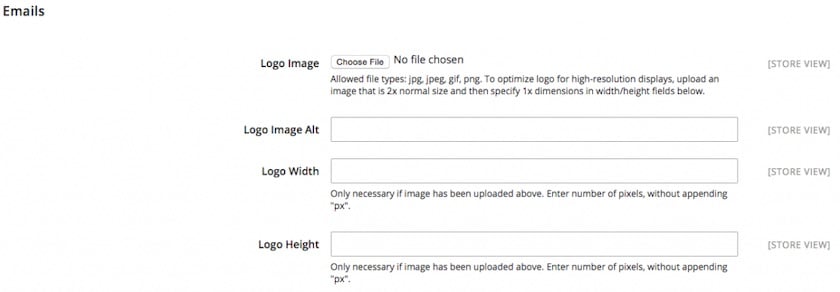
Finally for Design you need to make sure you add your Logo Image again under the Emails section so that your brand is displayed on transactional emails.
As before, don’t forget to click Save Config.
Currency
Next, let’s look at currency. You can change these settings under Currency Setup in the sub-menu on the left. For this guide we’ll assume you’ll only sell in one currency, and you’ll therefore only need to configure the following two settings:
- Base Currency – this is currency you’ll receive payment in
- Default Display Currency – in this instance this should be set to the same as Base Currency

Remember to click Save Config when ready.
Emails
In the Store Email Addresses sub-menu on your left you can set Sender Name and Sender Emails which will be used when Magento sends transactional emails to your customers. As a minimum you should set your Sender Name and Sender Emails for the following:
- General contact
- Sales representative
- Customer support

Again, don’t forget to Save Config, to ensure your settings are saved.
Sales
Once all the above settings have been set or amended, you can move onto the Sales section, which will look at the specifics that allow your customers to purchase from your website. We’ll leave the tax settings for the moment and address that in one of the following chapters of this guide titled Tax Management.
So the first sub-menu we’ll look at is Shipping Settings. Here you need to set the origin as your warehouse or the location from which your products are shipped.
Sales Configuration
Magento enables the user to manage the sale of each order. This can be done manually with native Magento functionality. In this section, we will discuss how to configure the shipping methods and default payment gateways, and what is required to get them up and running to take payment for your first order.
Shipping
Next we’ll look at the Shipping Methods sub-menu where you can give your customers some delivery options. In this guide we’ll show you how to set up a Flat Rate shipping method and a Free Shipping option if your customers spend above a certain amount (see Minimum Order Amount below). More advanced configuration is available, such asTable Rates and direct integration with couriers such as DHL and DPD. However, this will be addressed in a future guide.
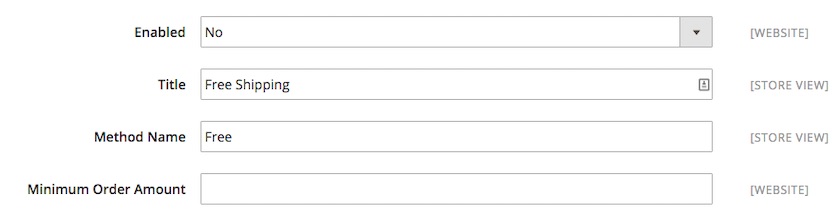
First we’ll look at Free Shipping. This is a great way of enticing your customers to spend a bit extra by offering free shipping if they spend over a specified amount, e.g. £100. To activate this:
- Enabled – change to yes
- Title – set this to what you want your customers to read on the checkout, e.g. Free shipping next day
- Method – as with Title this will be displayed to the customer as well, as per screenshot
- Minimum order amount – this is where you set the amount you want your customers to spend before this option is available. You should only enter the number, and not the currency symbol as this setting can, in theory, be used by multiple currencies when used with multi-store
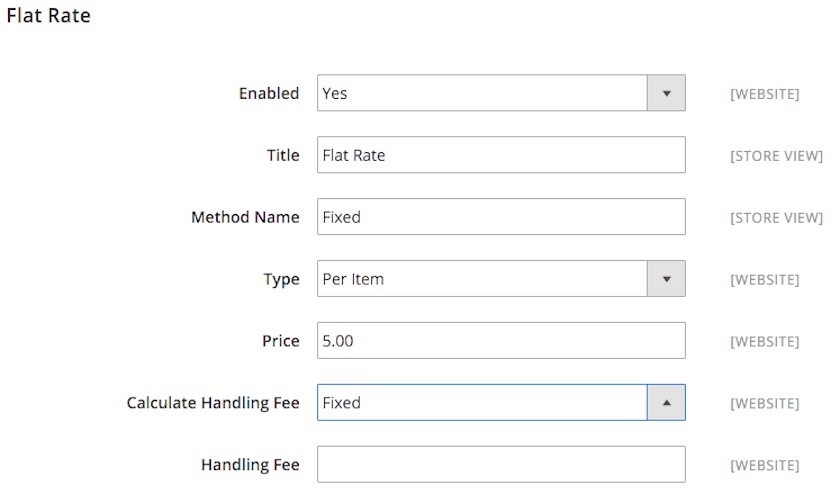
That’s all you need to do to set up a Free Shipping option for your customers. Now let’s move onto the Flat Rate option, which will give you the opportunity to set a fixed shipping price per item or order. This is straightforward to set-up:
- Enabled – change to Yes
- Title – set this to what you want your customers to read on the checkout, e.g. 2–3 working day delivery
- Method – as with Title, this will be displayed to the customer as well, as per screenshot
- Type – set the shipping fee to be calculated Per Item or Per Order
- Price – set what you want to charge for delivery, again please only enter the number, and not the currency symbol
- Calculate handling fee – if you want to charge an order handling fee you can set this to be a flat fee per order or a percentage value of your order
- Handling fee – if you leave this blank, your customers will not be charged an order handling fee. If you wish to charge an order handling fee, simply add the numeric value of the flat fee or percentage you want to charge (e.g. for £10, just add ‘10’ with no currency symbol – and for e.g. 6%, just add 0.06)
That’s all you need to do to provide your customers with essential delivery methods.
Payments
So with shipping configured, let’s look at payments, and the sub-header Payment Methods. As this is just an introductory guide, we’ve only provided simple instructions to get started with configuring PayPal Express Checkout. Other payment gateways such as Braintree are also provided natively with Magento Commerce, and we’ll provide more information in a later guide should you require this.
First of all you should set the Merchant Location to the country where you as a merchant are based. This should pick up the Default Country you set in the General configuration earlier in this guide, however, you can change it if needed.

Next, we’ll look at the PayPal set-up under the PayPal Express Checkout section. Expand the accordion and you will see a Configure button, click this and it will display both Required PayPal Settings and Basic Settings – PayPal Express Checkout.
Required PayPal Settings is all we need to look at. Simply enter your email associated with your PayPal Merchant account and click Get Credentials from PayPal.
This will open a separate window where you can login to your PayPal Merchant account. Once logged in you will see the API Username, API Password, and API Signature, which can be copied and pasted into the Magento admin fields.
After you’ve entered this information you need to Save Config before being able to enable PayPal Express as a payment option by changing Enable this Solution to Yes.
Tax management
With PayPal Express set-up, you’re getting closer to accepting payments on your site. Before we get into creating your products, we need to make sure you’ve got some basic tax rules in place. How you set this up will depend on a few factors such as:
- Country you’re selling to/from
- Products you’re selling (some countries have tax reductions on certain types of products such as food items)
- Customer type (e.g. some companies may not have to pay tax on products they buy).
In some countries there are more considerations. However, for this guide we’ll look at just setting up one basic rule for the UK market, which is a 20% VAT for all products.
First you need to verify a couple of settings in Magento Configuration, by clicking onStores > Configuration > Sales > Tax. There are plenty of configuration possibilities here, so double check with your accounts team to ensure everything meets your requirements. For now, we’ll just look at the essentials you need to check / change.
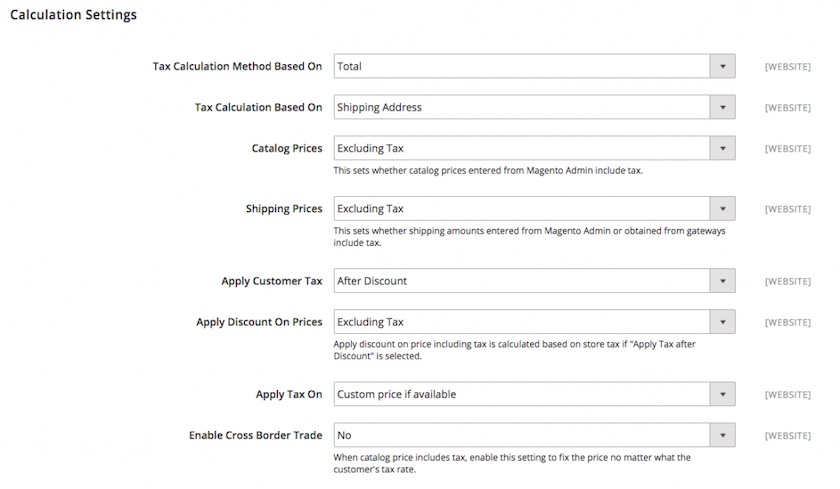
Calculation settings
The default setting assumes you add product prices without VAT, and that Magento will add the tax for you.
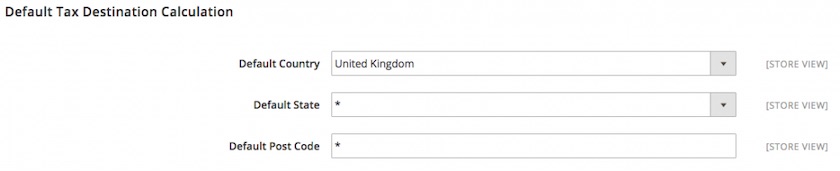
Default tax destination calculation
Change/verify that this is set to United Kingdom (or the country you’re selling in).
Price display settings
Set this to Including Tax for Display Product Prices in Catalog if you’re a B2C company and selling directly to customers.

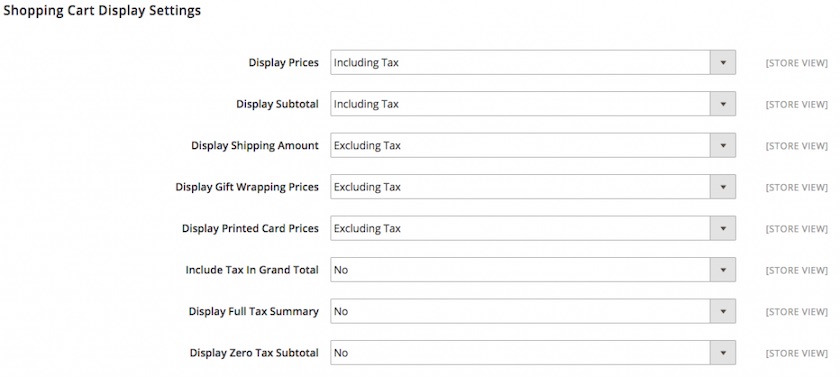
Shopping cart display settings
If you want to display the prices including tax/VAT on the cart and checkout, change both Display Prices and Display Subtotal to Including Tax. If the above is changed you should also set Include Tax in Grand Total to Yes.
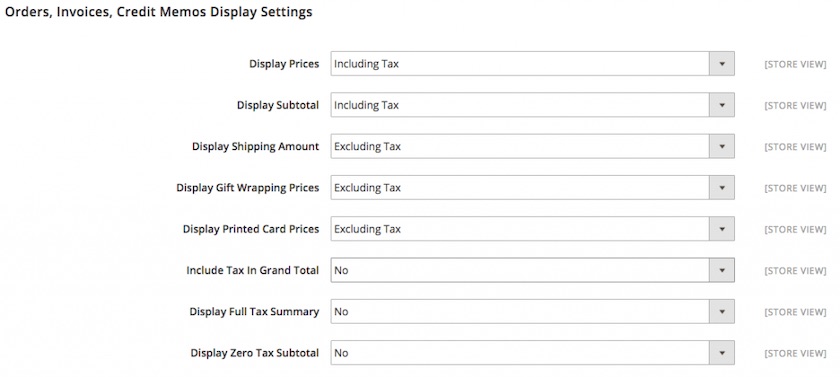
Order, invoice, credit memos display settings
For this, we recommend replicating the settings you made for Shopping Cart Display Settings in the previous step.
Configuration checks completed, you can now create the VAT tax rule, which you can find under Tax Management (Taxes) in the Stores section in the main navigation. In Magento Commerce, it is much quicker to set this up than in Magento 1 as you can create Tax Zones and Rates while you create your rule. So let’s click on Tax Rules, followed by Add New Tax Rule.

Add the name of your Tax Rule, e.g. VAT and then click the Add New Tax Rate link below the Tax Rate.

Clicking on the Add New Tax Rate will open an overlay where you can enter your new Tax Rate, and you have to simply add the following:
- Tax Identifier – VAT (or whatever you want to call the rule)
- Zip/Post is Range – Leave checkbox unchecked
- Zip/Post Code – Leave the ‘*’ here as it will apply to all postcodes
- Country – Select United Kingdom
- Rate percent – Add ’20’
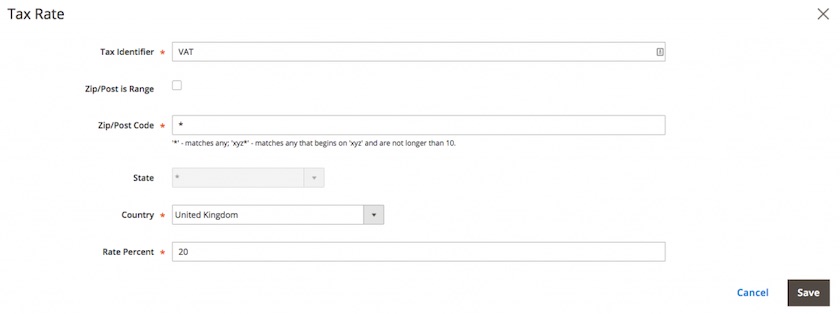
Now you’ve created a new Tax Rate called VAT at 20% (or the rate that’s applicable to you), then all you have to do is to click Save Rule.
Category administration
The category section of Magento Commerce allows you to control how products are organised and are structured.
To manage the categories go to Products > Categories and you will see 2 sections:
- Category structure – On the left, the category structure is displayed. You can see all categories and their sub-categories
- Category detail – On the right, you have the category detail section where you can edit the category specific information

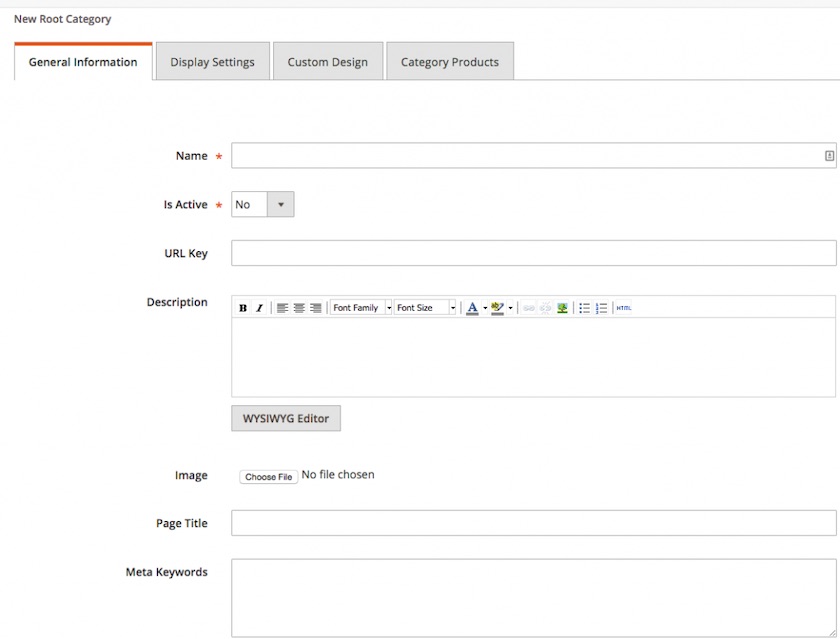
Setting up a new root category
We’ll run through how to setup a new root category. Once you have navigated to Products > Categories you should see the empty fields to create a new category (see above image). Give this category a name and change the Is Active to Yes.
All other info on this tab is optional so for now you can skip over this. The final thing you need to set is Include in Navigation Menu. If you want this to appear in your menu on the site then change this to Yes.
Once this is done click Save Category and the category is now set-up. Once you’ve set up a Root Category, you can create multiple sub-categories by simply clicking on the category where you want to add the subcategory, and click Add Subcategory – then simply follow the same process as above to complete the subcategory.
Product administration
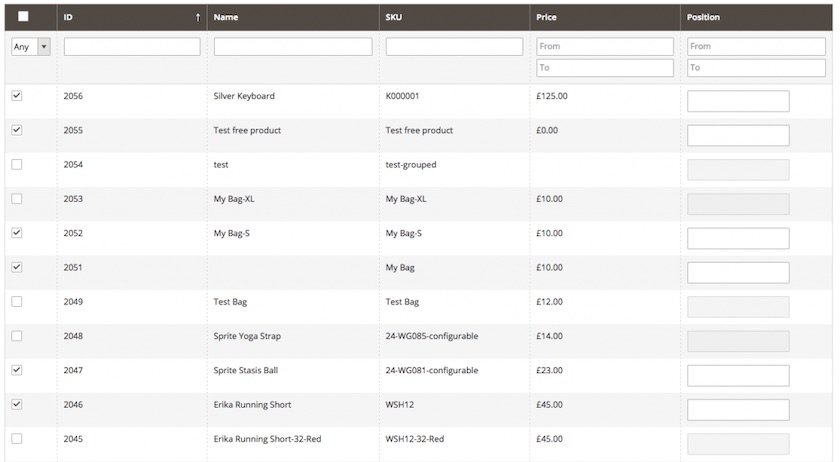
Now you’ve got your categories, you’ll want to start filling it with your awesome products. To do this navigate to Products > Catalog.
There you will see the Add Product button. Click on this to create your first product.
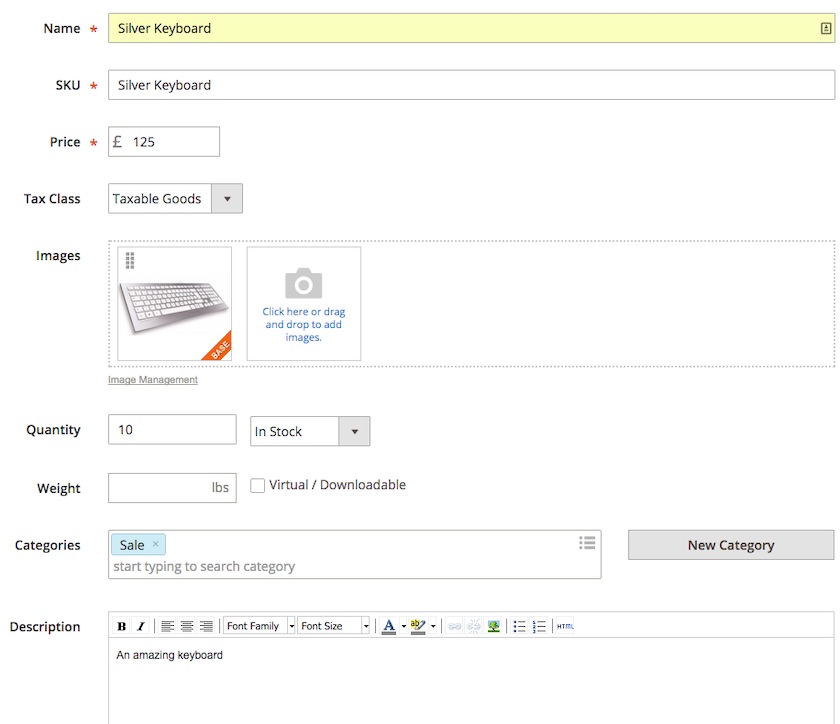
On this page you will see the general information needed for the product. Below you can see the information for a silver keyboard that we are creating.
The only required fields for this section are Name, SKU, and Price. We have put this product straight into the ‘Sale’ category, but you can easily add the product into more categories by typing in the category name. Alternatively you can create new categories on the fly by clicking New Category.
And that is all you need to create a new product! Be sure to hit the Save button to complete the set-up.
All this info can be edited at anytime – just locate the product in the catalog screen and click it to open up the product info.
Above we showed you how to create a simple product. You can set up a few different types of product, which can be done by clicking on the arrow next to the Add Product button and then selecting one of the below options:
- Simple – A product with no variables and only one choice to buy e.g The Lion King DVD.
- Configurable – A product that has different choices, sizes, colours, materials, or specs etc. For example, a T-shirt that comes in Red, Blue and Green and can be size S, M, L or XL.
- Grouped – A group of products which can be a selection of the above types. They will appear as separate products in the customer’s basket.
- Virtual – When the customer won’t be sent anything but is given, for example, 'credits' to use on your site.
- Bundle – This is a product where you can add other products to it, for example adding RAM, then a hard drive to a laptop.
- Downloadable – A product that, once purchased, can be downloaded, like a document or PC game.
- Gift card – A gift card that can be used for your products.

These options should allow you to set up any type of product you want to sell.
Content pages
Adding and managing your amazing content via a content page is very easy; simply navigate to Content > Pages. Here you can create a new page with any content you like.
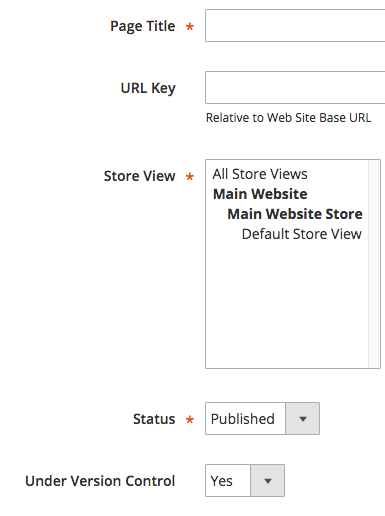
Click Add New Page to get started.
Begin by giving the page a title and then select which store view you want it to display on.
Then select Published from the drop-down menu, and that is the admin complete for your new content page.
To add the content, use the left hand table to navigate to content and here you can add your brilliant content.
Don’t forget to hit the Save Page button.
Promotional rules
With Magento Commerce’s promotion features you can reward your customers with money off their orders. There are 2 ways you can do this:
- Catalog price rules – allows you to set a discount rule across a whole category
- Cart price rules – allows you to set a discount on the basket level, regardless of products
The main difference here is that Catalog Rules are enacted on products before they are added to the cart, while Cart Price Rules are applied in the shopping cart.
To add a new rule navigate to Marketing > Promotions where you will see the 2 options mentioned above.
 Catalog price rules
Click the Catalog Price Rule option to begin. Then, click the Add New Rule button to get started.
As usual, all fields with a *red asterix* need to be filled in.
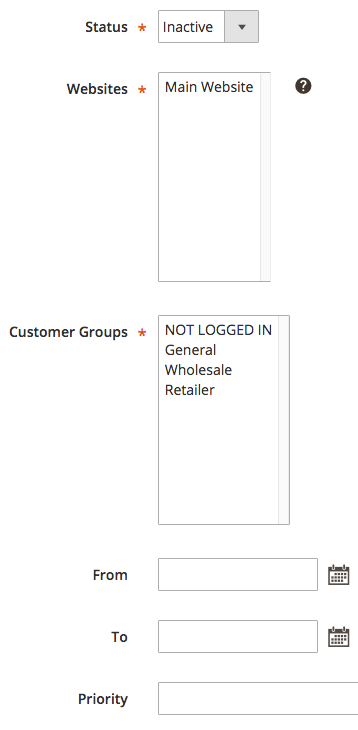
On the Rule Information tab, give your promo rule a name. This is for internal purpose only and the customer will not see it. Set Statusto Active to turn the promotion on.
You can choose which of your sites this promotion will work on. In this example we only have 1 site so that has been selected. If you want to limit your promotion to certain Customer Groups you can also do that here.
Put a From and To rule to set a valid date range for this promotion. If left blank it will run indefinitely until set as Inactive. You can set the priority of this rule in relation to other rules.
Now you need to decide what conditions need to be met for the discount to be applied.
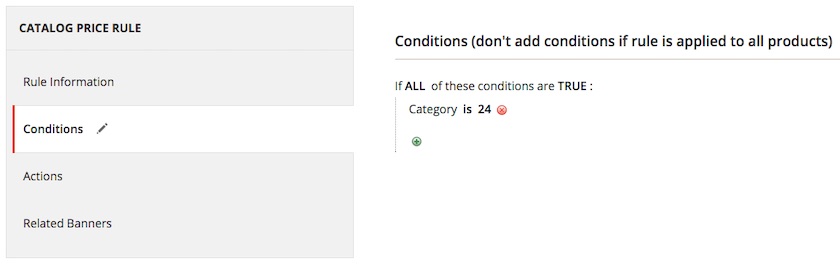
For this example we have chosen to give 10% off the Women’s category (Category ID 24). To apply the 10% discount, navigate to the Actions tab and, from the drop down, selectApply as percentage of original price and enter 10 as the discount amount. If you want to discount all products in subcategories of a top level category then select Yes for Subproduct discounts. Finally, if you don’t want any other promos to be added if someone is using this discount, then set Disregard subsequent rules to Yes.

Hit Save and apply and you’re done!
Cart price rules
Cart Price Rules are promotions you can apply to a customer’s basket regardless of the products they buy and you can also introduce a promotional code customers must enter (either a general one or a unique code). Go to Marketing > Cart Price Rules and click Add New Rule. Enter the same information as required above on the Rule Information tab. You can also specify how many times a code can be used. If you click Coupon the dropdown options are:
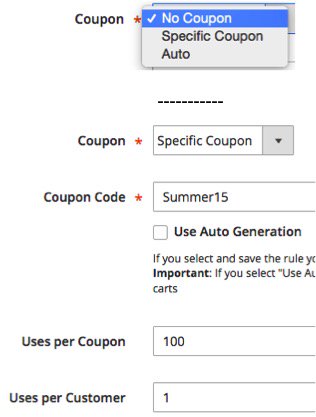
- No Coupon – Discount will auto apply
- Specific Coupon – You can customise the coupon required (allows you to auto-generate multiple random codes)
- Auto – Magento will automatically generate coupon codes on the fly, which is particularly useful if you’re using it with an abandoned basket reminder.
Here we have chosen a specific voucher code and chosen to limit it to only 100 orders and only 1 order per customer.
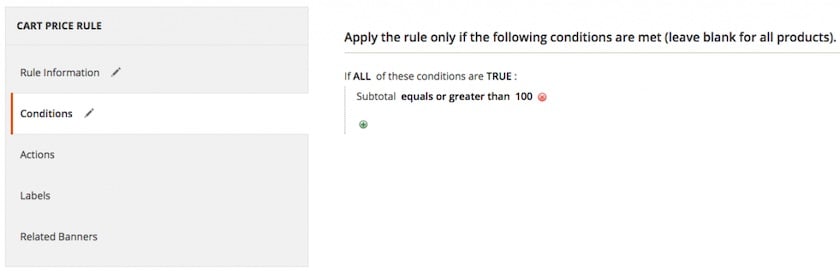
Next you will need to apply the Conditions. For this example we are offering £15 discount on orders of £100 or more, so we need to make the conditions trigger when a customer has £100+ of goods in their basket.
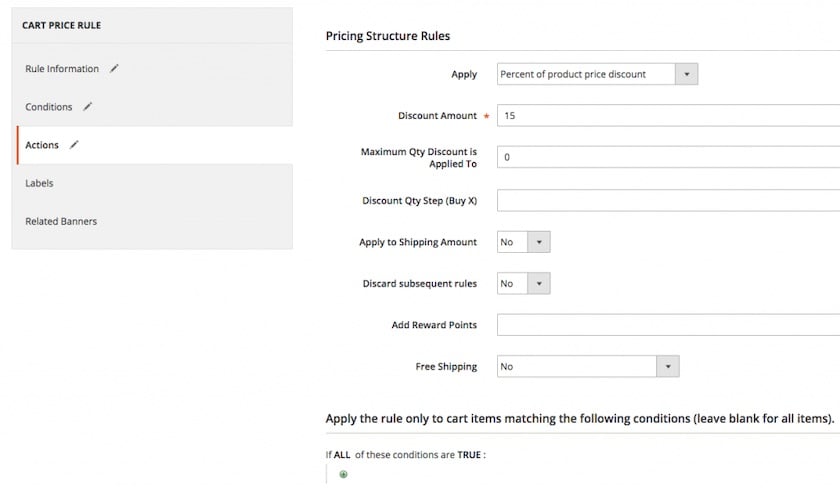
Now we need to set the Actions.
Select Fixed amount discount and enter 15 in the Discount Amount. If you want to limit the amount of discount, you can do this in the next step – most useful when you are offering a percentage discount. Complete the rest of the steps and then review the rules at the bottom of this tab. If you want to restrict the products the discount can be applied to, you can do that here. For example, to protect the margin of certain products.
This is all the essential information required so once complete hit Save and you’ve now set-up 2 new promotions.
Order processing
When you’ve made your first sale, you need to process the order and get the product shipped to your customer. To view a list of all orders you have received go to Sales > Orders.
You’ll see a list of orders that have been made through your site, and in this guide we’ll show you how to process an order and do a refund.
First of all click on View in the Action column as seen in the screenshot below.

Depending on your payment integrations, the payment may have been taken already and if so, the Status of the purchase will be in Processing and an invoice will already have been created. If you’re using a payment method, such as Check/Money order as shown in this example, the invoice has not been created and the status of the order is Pending.
To create the invoice simply click the Invoice link at the top of the order view.

Scroll to the bottom if you wish to part invoice the order. You can do this by altering the quantity in the Items to invoice section as per the screenshot below.
In this example, we will keep things simple and invoice the whole order, and you can do this by clicking the Submit Invoice button in the bottom right corner of the invoice.
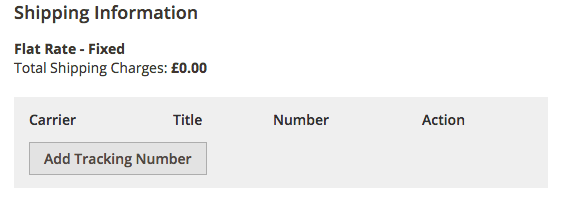
The order is now ‘paid’ and is ready to ship. Simply click the Ship link at the top of the order view.

When creating a new shipment you can add a tracking number if required by simply clicking the Add Tracking Number and adding the details. These details will be emailed to your customer in the delivery notification.
You can also choose only to part ship an order by adjusting the quantity against each item in the shipment.
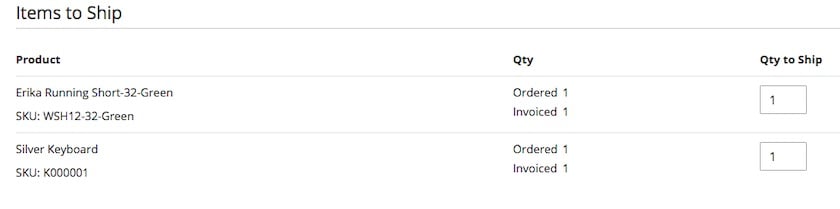
Once you’re happy with the shipment, you can create the new shipment by clicking the Submit Shipment button in the bottom right corner of the New Shipment view. Your order has now been marked as Complete and your customer will receive the shipment email.
Refunds
When you’re ready to refund an order, simply open the order you want to refund and click on Credit Memo as shown in the screenshot below.
Create Return will be covered in a later guide, as this is related to the Enterprise feature, Return Management Authorization.

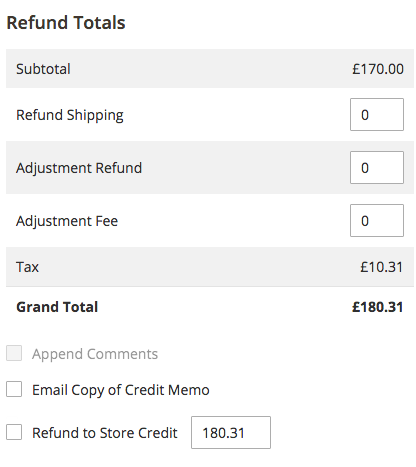
Scroll down to the Items to Refund section and confirm that you’re happy to refund all items. If you only want to refund certain items, just update the Qty to Refund and the correct amount to refund will automatically be updated. The item will not be automatically added back to the stock in Magento unless you tick the Return to Stock checkbox.

Once you’re happy with the items you want to return, you can scroll down and review the Refund Totals section where you can make manual adjustments as required. There’s also an option where you can refund to the customer’s Store Credit rather than refunding the money. That way the customer can spend the store credit on their next order(s) on your website.
Once you’re happy to process the refund, simply click Refund Offline. Depending on your payment gateway you may have another option available to Refund Online which will automatically refund the amount through the payment gateway. If it is refunded offline you will have to manually refund through the payment gateway.
Once processed the order will appear as Closed.
Customer information
Your customers are the most important thing about your online store so it’s imperative you know who they are, how they spend, and what they are worth to you.
Magento Commerce gives you plenty of details about each customer so here is a run through of some key parts.
If you go to Customer > All Customers you will see the table below, which shows some general information about all your customers.
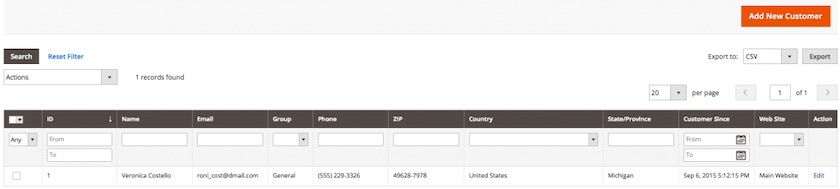
Here you can search for a specific user and can amend any details, such as a change of name on an account. Use the search fields just below the title of each column. Once you have found the person you are after you can click on them and view their information in more detail. Key tabs include:
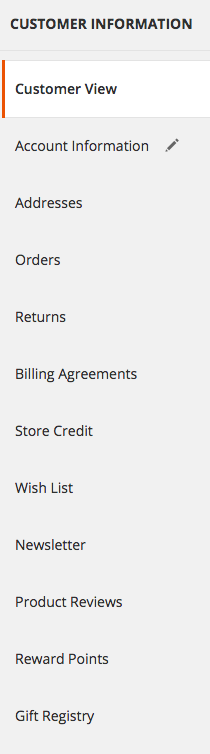
- Account Information – allows you to edit the customer group, name and email address
- Addresses – where you can update the shipping and billing address, or add new addresses on the customer’s request
- Orders – shows you all previous orders in detail including date, items, and value.
- Product Reviews – if enabled on your site you can see what kind of reviews each person is leaving. All of these tabs contain very useful information to help paint a picture of who your customers are.
Conclusion
The above guide provides you with the essential knowledge to set up a simple Magento Commerce store. We hope that you have found the Magento Commerce admin interface easy to navigate, and more intuitive to use than the Magento 1 panel. If you’re new to Magento, we think you’ll find the admin panel easy to get to grips with. Magento Commerce has the hallmarks of becoming a great asset for merchants, and we’ll be following up this tutorial with further guides on some of its more advanced admin features.
Glossary
- Configuration – General: This is where you’ll find the general settings which will apply to your website, such as your company information. These settings do not cover sales or products.
- Configuration – Sales: This is where you’ll find the settings directly linked to the sales side of your website.
- Multi-store: Magento Commerce provides multi-store functionality, which means that you can set up several stores on one single Magento instance. You can use this to create a localised site for your brand in many countries with different currencies and language, for example, or you can use it to house many brands under one single Magento instance.
- Configuration scope: Magento allows you to set settings and data on different levels so that certain data/ settings can be inherited from a parent scope. In Magento there are 4 levels: Global, Website, Store, and Storeview.
- Global: This is your entire Magento installation.
- Website: Websites sit at the top of the Magento setup and refer to the domain you use. One website can have one or more Stores and many websites can be used on a single installation.
- Store: Stores refer to your product catalogue. One website can therefore have multiple stores. The root category is configured at this level which allows multiple stores under the same website to have different catalogue structures.
- Store view: Store views offer a primary advantage for international retailers as they enable localised content. At this level, you can localise content for different markets and adjust product titles and descriptions. The majority of international retailers use this level for language settings.
- CE: Magento Community Edition. CE requires no licence fee and is the entry-level version of Magento.
- EE: Magento Enterprise Edition. ME contains more features than Magento CE and has optimised performance. A licence fee applies.
- Beta: Beta is a commonly-used name for a phase of the product lifecycle when it is being extensively tested in the real world before officially being released. Though Magento Commerce is in beta at the time of writing, its official commercial launch is expected in late 2015.
- Base URL: This is a Magento term for your domain name. Most commonly, it will be http://www.yourstore.com.
- Secure base URL: Similar to base URL. However, this is the secure version which means you site will use https instead of http where you have a SSL (Secure Sockets Layer) Certificate on your website. Note: you should have SSL on any pages where transactions of customer data takes place, and Google now recommends
- Native: In this context, native is used to describe a feature that comes 'out of the box' with the Magento platform and does not have to be developed by a software engineer.
- Favicon: The small icon displayed next to the text on the browser tab and in your list of bookmarks.
- Default country: This is the default country of your store. This setting will be reused in other settings unless overridden.
- Base currency: This is the currency you’ll receive payment in.
- Default display currency: This is the default currency displayed to your customers online and does not have to be the same as your base currency.
- Minimum order amount: In certain settings you can set a minimum order amount. For example, a customer could be eligible for free shipping when they reach a spending threshold). This setting ensures any such rules are only triggered when the spending requirements is reached.
- API: Application Program Interface. This is how you can connect a system / platform, such as Magento, to another platform or system. It’s commonly used with Magento to connect it to Order Management and Accounting Systems.
- Default tax destination calculation: This should be set to where your business operates out from as it forms the basis of your tax calculations.
- Cart price rules: These are the promotional rules that you can apply to the shopping cart/basket.
- Catalog price rules: These are the promotional rules that you can apply on a product level.
- Credit memo: Used to refund money to your customer. You will create a credit memo against an invoice.