How to use system configuration and helpers in Magento 2
This tutorial for Magento 2 (now known as Magento Commerce/Magento Open Source) developers looks at the system configuration and use of helpers, which are designed to simplify your work with Magento store. A helper contains practical functions and can be called from anywhere.
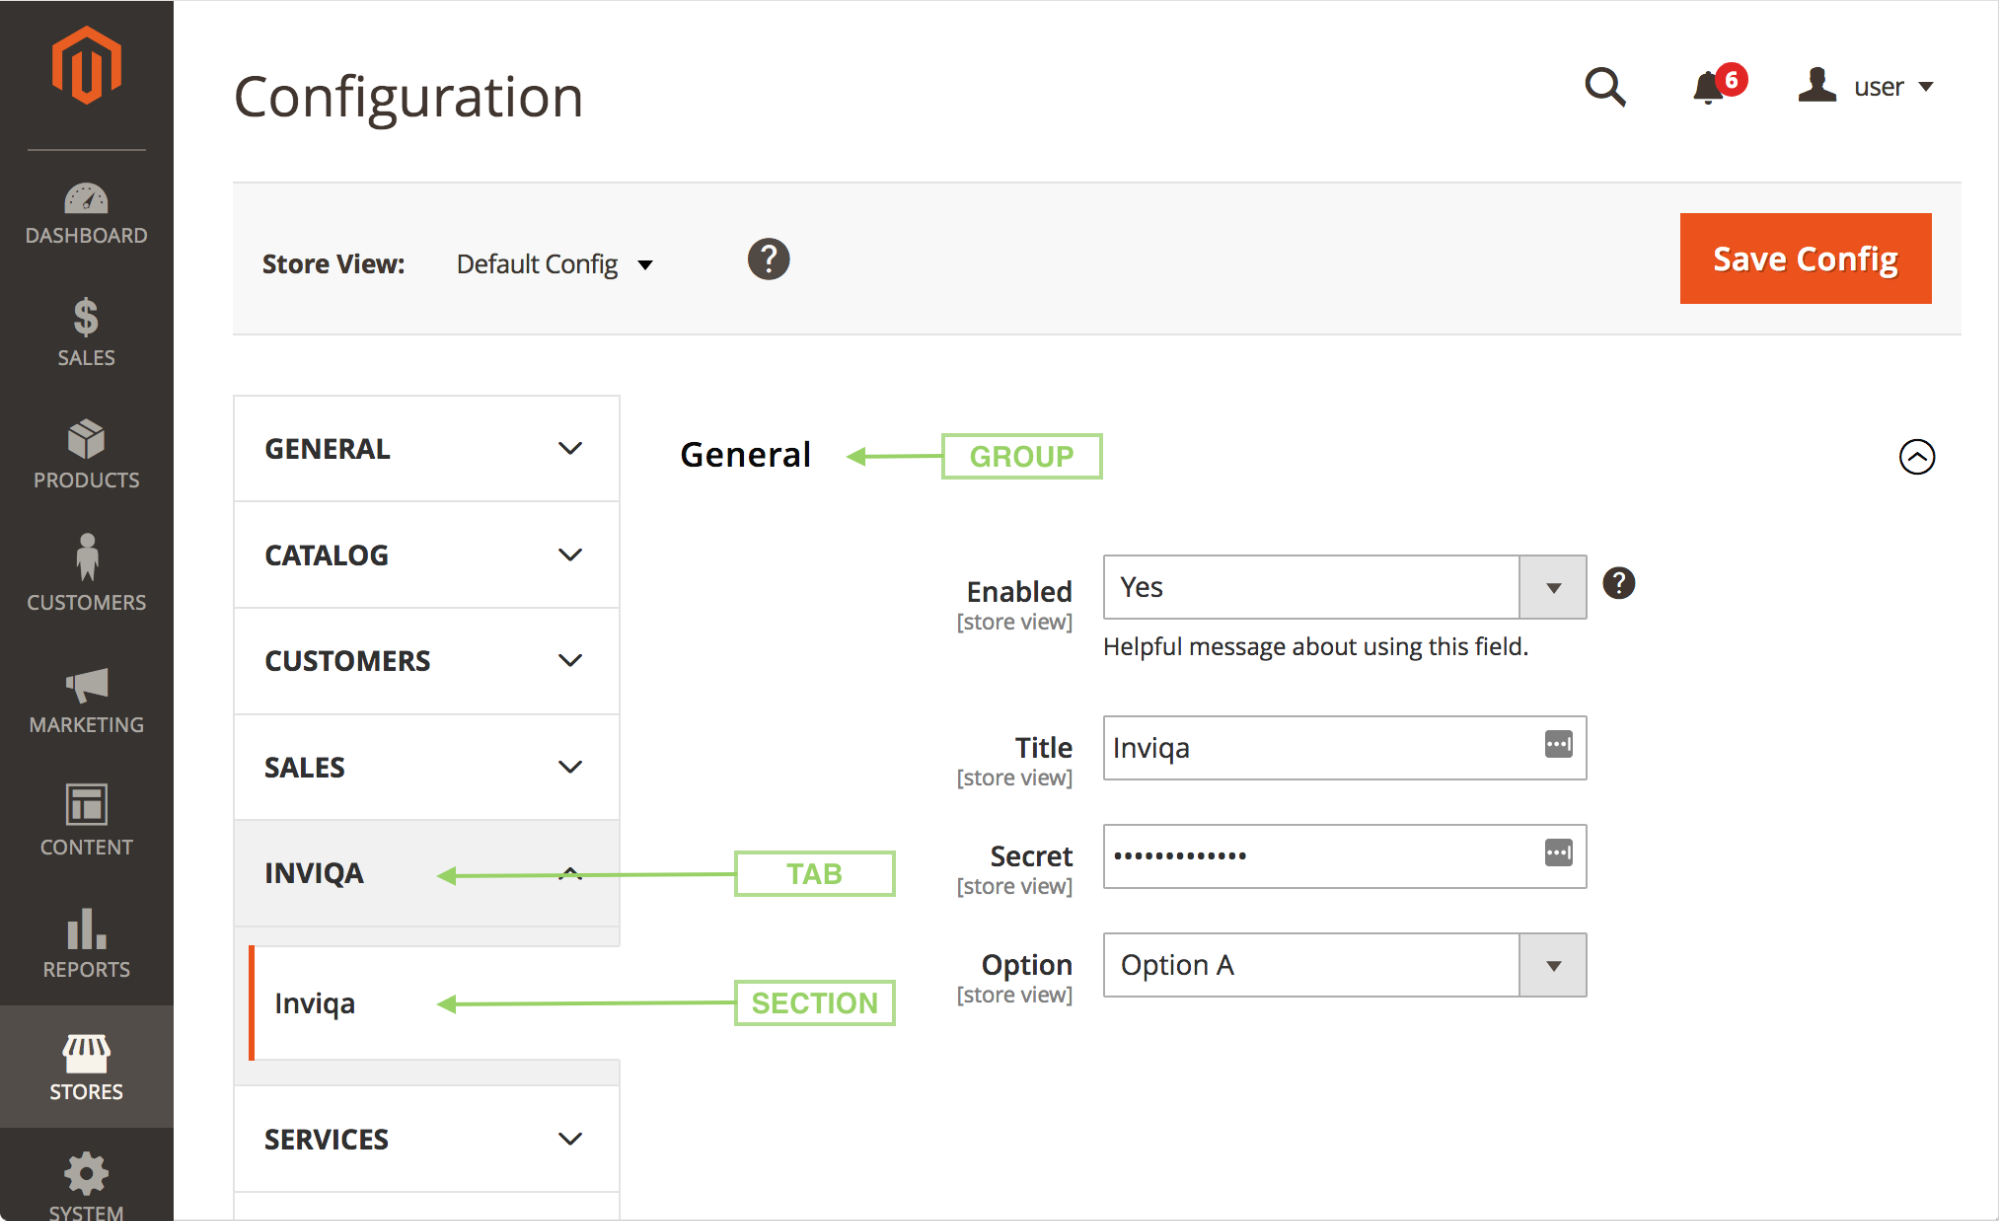
In this guide we'll highlight differences and changes between configuration and helpers in Magento 1, and we'll use code to create the configuration section shown in the below screenshot, which shows a new tab ('INVIQA'), a section ('Inviqa'), and a form group ('General').
Directory structure
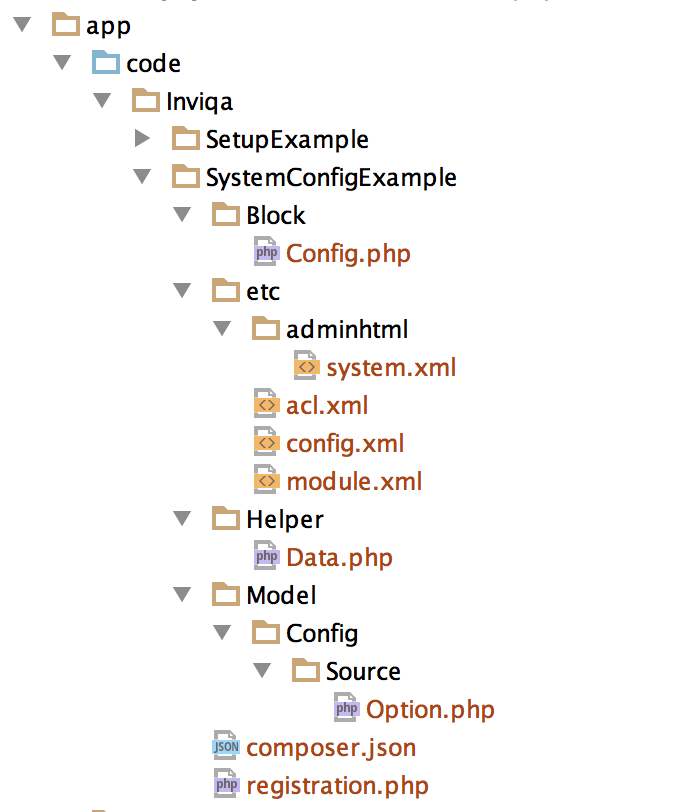
The screenshot below shows the layout of the file structure, which is quite similar to that of Magento 1. However, since Magento 2 now has a concept of area-specific configuration, the system.xml is located one level deeper in an adminhtml directory. So the path is etc/adminhtml/system.xml.
System config file
So, as I mentioned before, the system config file is at etc/adminhtml/system.xml. In the example code it looks like this:
<?xml version="1.0"?>
<config xmlns:xsi="http://www.w3.org/2001/XMLSchema-instance" xsi:noNamespaceSchemaLocation="urn:magento:module:Magento_Config:etc/system_file.xsd">
    <system>
        <tab id="inviqa" translate="label" sortOrder="1000">
            <label>Inviqa</label>
        </tab>
        <section id="inviqa" translate="label" sortOrder="10" showInDefault="1" showInWebsite="1" showInStore="1">
            <label>Inviqa</label>
            <tab>inviqa</tab>
            <resource>Inviqa_SystemConfigExample::inviqa</resource>
            <group id="general" translate="label" sortOrder="10" showInDefault="1" showInWebsite="1" showInStore="1">
                <label>General</label>
                <field id="enabled" type="select" translate="label,comment,tooltip" sortOrder="10" showInDefault="1" showInWebsite="1" showInStore="1">
                    <label>Enabled</label>
                    <source_model>Magento\Config\Model\Config\Source\Yesno</source_model>
                    <config_path>inviqa/general/enabled</config_path>
                    <comment>Helpful message about using this field.</comment>
                    <tooltip>Longer helpful message about using this field.</tooltip>
                </field>
                <field id="title" type="text" translate="label" sortOrder="20" showInDefault="1" showInWebsite="1" showInStore="1">
                    <label>Title</label>
                    <validate>required-entry alphanumeric</validate>
                    <config_path>inviqa/general/title</config_path>
                    <depends>
                        <field id="enabled">1</field>
                    </depends>
                </field>
                <field id="secret" type="obscure" translate="label" sortOrder="30" showInDefault="1" showInWebsite="1" showInStore="1">
                    <label>Secret</label>
                    <validate>required-entry</validate>
                    <backend_model>Magento\Config\Model\Config\Backend\Encrypted</backend_model>
                    <config_path>inviqa/general/secret</config_path>
                    <depends>
                        <field id="enabled">1</field>
                    </depends>
                </field>
                <field id="option" type="select" translate="label" sortOrder="40" showInDefault="1" showInWebsite="1" showInStore="1">
                    <label>Option</label>
                    <source_model>Inviqa\SystemConfigExample\Model\Config\Source\Option</source_model>
                    <config_path>inviqa/general/option</config_path>
                    <depends>
                        <field id="enabled">1</field>
                    </depends>
                </field>
            </group>
        </section>
    </system>
</config>
Now let's try and break that down to understand it better:
...
        <tab id="inviqa" translate="label" sortOrder="1000">
            <label>Inviqa</label>
        </tab>
        ...
This xml code is hopefully quote self explanatory; it adds a new expandable tab to the left-hand tab menu.
 ...
        <section id="inviqa" translate="label" sortOrder="10" showInDefault="1" showInWebsite="1" showInStore="1">
            <label>Inviqa</label>
            <tab>inviqa</tab>
            <resource>Inviqa_SystemConfigExample::inviqa</resource>
            ...
        </section>
        ...
This code adds a new section to the tab. There are a few things to further breakdown here.
Firstly, the section attributes showInDefault="1" showInWebsite="1" showInStore="1" designate the scope visibility of the section. In this case the section will show in all scopes (default, website, and store). Configuration scopes in Magento 2 work the same as they did in Magento 1.
Secondly, <tab>inviqa</tab> assigns the section to the new tab by referencing the value of the tab id attribute defined earlier.
Finally, <resource>Inviqa_SystemConfigExample::inviqa</resource> specifies a resource id that will be referenced in etc/acl.xml. This will be further explained below:
 ...
            <group id="general" translate="label" sortOrder="10" showInDefault="1" showInWebsite="1" showInStore="1">
                <label>General</label>
                ...
            </group>
            ...
This code adds a new field grouping to the section. The scope attributes work in the same way as described above.
...
                <field id="enabled" type="select" translate="label,comment,tooltip" sortOrder="10" showInDefault="1" showInWebsite="1" showInStore="1">
                    <label>Enabled</label>
                    <source_model>Magento\Config\Model\Config\Source\Yesno</source_model>
                    <config_path>inviqa/general/enabled</config_path>
                    <comment>Helpful message about using this field.</comment>
                    <tooltip>Longer helpful message about using this field.</tooltip>
                </field>
                ...
This code adds a new select field to the group. It specifies the core model Magento\Config\Model\Config\Source\Yesno in the source_model attribute to supply the values to select. As in Magento 1, this format of presenting a Yes/No option in a select list is the preferred way to present boolean options in the system configuration.
It also specifies 'inviqa/general/enabled' in the config_path attribute. This attribute is entirely optional, and by default Magento will determine the config path using the xml structure of the config alone.
However, it can be useful to define your own config path for a couple of reasons. Firstly, you may need to refactor your system configuration, which may result in the default path changing (which will otherwise require the configuration to be resaved).
Secondly, you may want to simplify or flatten the config paths if you have many levels of group nesting. In this case the value 'inviqa/general/enabled' is actually the same as that derived from the xml structure so could be removed with no effect.
Below that there are <comment> and <tooltip> tags, which are used to display extra information. The content of the former tag is displayed below the field, and the content of the latter tag is shown when the use hovers over the tooltip icon, which is displayed as a question mark to the right of the field.
In order to make these text strings available to the translate feature, the tags are added to the translate attribute of the enclosing field tag as a comma-separated list i.e. translate="label,comment,tooltip".
...
                <field id="title" type="text" translate="label" sortOrder="20" showInDefault="1" showInWebsite="1" showInStore="1">
                    <label>Title</label>
                    <validate>required-entry alphanumeric</validate>
                    <config_path>inviqa/general/title</config_path>
                    <depends>
                        <field id="enabled">1</field>
                    </depends>
                </field>
                ...
This code adds a plain text field to the group. It adds validation by specifying a space delimited string to the validate tag. Here it ensures that a value must be entered and that it must only be alphanumeric. The full range of validation options can be found by looking in the file vendor/magento/magento2-base/lib/web/mage/validation.js.
The code also adds a depends tag, which contains a field tag referencing the 'enabled' field. This has the effect of only revealing the 'title' field when the 'enabled' select field is set to 'Yes'. The remaining fields in the example code also have the same dependency. This strategy can be used to tidy up the configuration and make it more obvious which fields need filling out first.
...
                <field id="secret" type="obscure" translate="label" sortOrder="30" showInDefault="1" showInWebsite="1" showInStore="1">
                    <label>Secret</label>
                    <validate>required-entry</validate>
                    <backend_model>Magento\Config\Model\Config\Backend\Encrypted</backend_model>
                    <config_path>inviqa/general/secret</config_path>
                    <depends>
                        <field id="enabled">1</field>
                    </depends>
                </field>
                ...
This code adds a password field to the group. This is done by setting the field type attribute as 'obscure'. On its own, however, the field will still be stored as plain text.
So in addition it uses <backend_model>Magento\Config\Model\Config\Backend\Encrypted</backend_model> which encrypts the value stored in the core_config_data table.
 ...
                <field id="option" type="select" translate="label" sortOrder="40" showInDefault="1" showInWebsite="1" showInStore="1">
                    <label>Option</label>
                    <source_model>Inviqa\SystemConfigExample\Model\Config\Source\Option</source_model>
                    <config_path>inviqa/general/option</config_path>
                    <depends>
                        <field id="enabled">1</field>
                    </depends>
                </field>
                ...
And lastly, this code adds a select field with a custom set of options by referencing a custom source model. The contents of the example source file look like this:
<?php

namespace Inviqa\SystemConfigExample\Model\Config\Source;

use Magento\Framework\Option\ArrayInterface;

class Option implements ArrayInterface
{
    public function toOptionArray()
    {
        return [
            ['value' => '1', 'label' => __('Option A')],
            ['value' => '2', 'label' => __('Option B')],
            ['value' => '3', 'label' => __('Option C')],
        ];
    }
}
As you can see, this file simply implements ArrayInterface and has a toOptionArray which returns a set of option values.
ACL config file
As in Magento 1, access to configuration sections in Magento 2 (now known as Magento Commerce) is regulated using ACL (Access Control List) definition files.
It's good practice to set up ACL access as it allows administrators to create custom roles with just the access required to perform certain day-to-day duties. This in turn improves the stability and security of the application, because if the role has minimal privileges, it minimises the possibility of key settings being changed by mistake – or, in the case where a user has gained unauthorised access, it minimises the damage that can be done. User roles can be set up in System > User Roles.
ACL resource definitions are located in a module at etc/acl.xml.
In our example code, it looks like this:
<?xml version="1.0"?>
<config xmlns:xsi="http://www.w3.org/2001/XMLSchema-instance" xsi:noNamespaceSchemaLocation="urn:magento:framework:Acl/etc/acl.xsd">
<acl>
<resources>
<resource id="Magento_Backend::admin">
<resource id="Magento_Backend::stores">
<resource id="Magento_Backend::stores_settings">
<resource id="Magento_Config::config">
<resource id="Inviqa_SystemConfigExample::inviqa" title="Inviqa" />
</resource>
</resource>
</resource>
</resource>
</resources>
</acl>
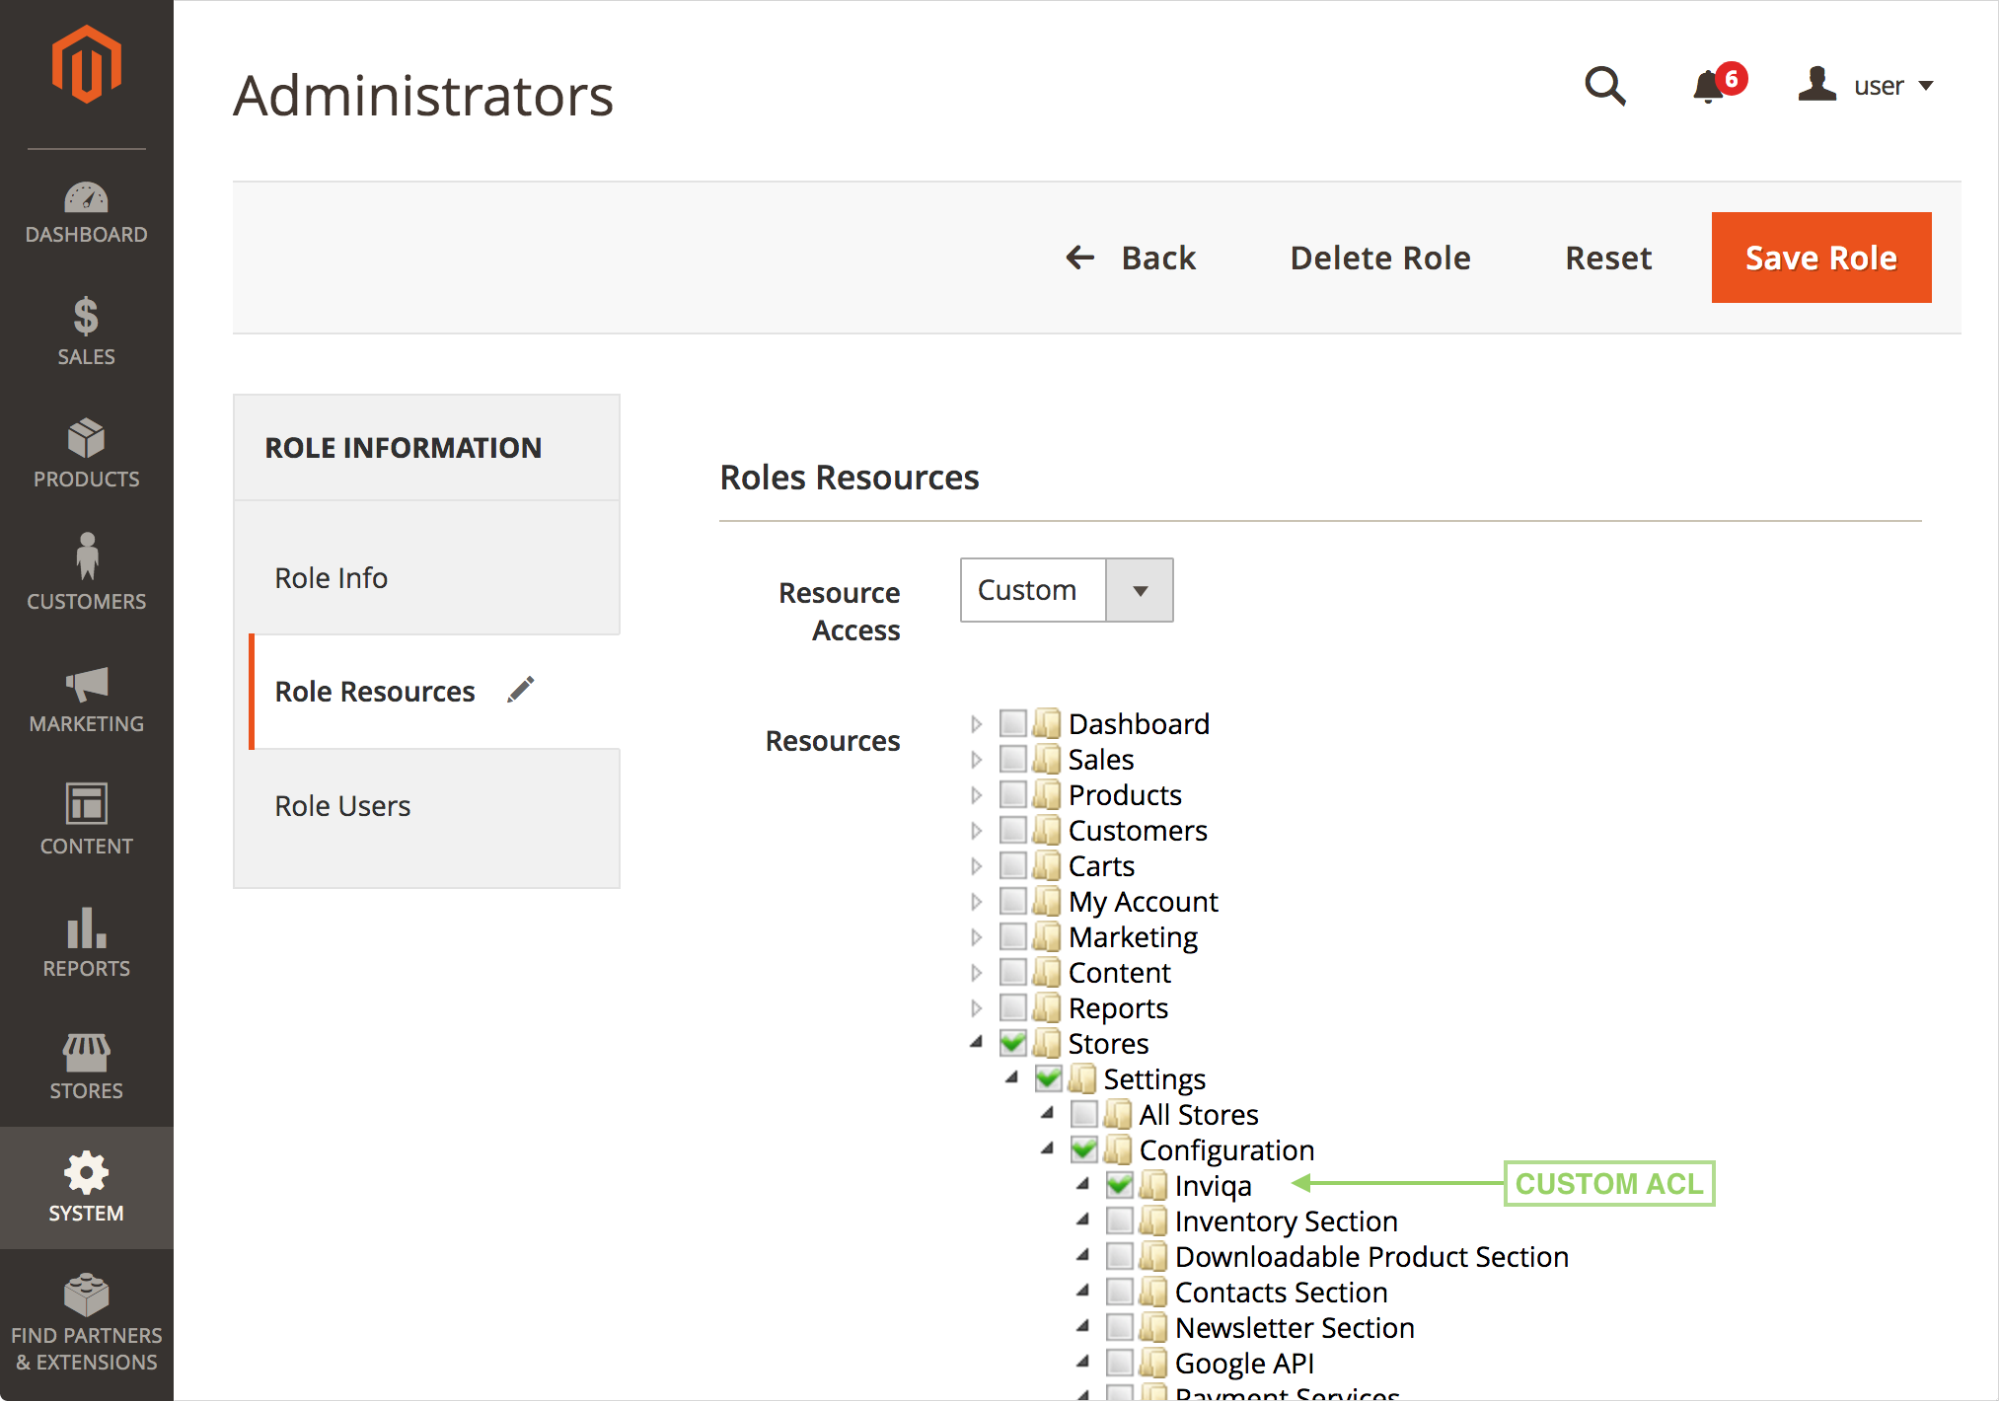
</config>The majority of this file is boilerplate code, but the critical line is <resource id="Inviqa_SystemConfigExample::inviqa" title="Inviqa" /> which ties the resource id defined above in etc/system.xml ('Inviqa_SystemConfigExample::inviqa') to the Magento config ACL. This will make it visible in System > User Roles > {User} > Role Resources, as demonstrated in the screenshot below.
Default config file
Sometimes you will want to supply default configuration values to your custom form fields. This can be achieved quite simply by creating etc/config.xml as follows.
<?xml version="1.0"?>
<config xmlns:xsi="http://www.w3.org/2001/XMLSchema-instance" xsi:noNamespaceSchemaLocation="urn:magento:module:Magento_Store:etc/config.xsd">
    <default>
        <inviqa>
            <general>
                <title>Inviqa</title>
            </general>
        </inviqa>
    </default>
</config>
Here we ensure that a default value of 'Inviqa' will be displayed in the title field. The xml structure matches the config path defined from etc/adminhtml/system.xml, which is 'inviqa/general/title'.
If you have used the config_path attribute in etc/adminhtml/system.xml to create a non default config path, the xml structure here will need to match that instead.
Helper file
Once the system configuration has been set up and saved into the core_config_data table it is then available for use throughout the Magento system.
It's recommended (though not mandated) that a helper is used to retrieve the values. This approach has a couple of benefits. Firstly, the config paths are only hardcoded in one location, so not duplicated throughout the codebase. This makes code maintenance easier. Secondly, the abstract helper already has Magento\Framework\App\Config\ScopeConfigInterface injected for immediate use.
The helper in our example code looks like this:
<?php

namespace Inviqa\SystemConfigExample\Helper;

use Magento\Framework\App\Helper\AbstractHelper;
use Magento\Framework\App\Helper\Context;
use Magento\Framework\App\Config\ScopeConfigInterface;
use Magento\Framework\Encryption\EncryptorInterface;

class Data extends AbstractHelper
{
    /**
     * @var EncryptorInterface
     */
    protected $encryptor;

    /**
     * @param Context $context
     * @param EncryptorInterface $encryptor
     */
    public function __construct(
        Context $context,
        EncryptorInterface $encryptor
    )
    {
        parent::__construct($context);
        $this->encryptor = $encryptor;
    }

    /*
     * @return bool
     */
    public function isEnabled($scope = ScopeConfigInterface::SCOPE_TYPE_DEFAULT)
    {
        return $this->scopeConfig->isSetFlag(
            'inviqa/general/enabled',
            $scope
        );
    }

    /*
     * @return string
     */
    public function getTitle($scope = ScopeConfigInterface::SCOPE_TYPE_DEFAULT)
    {
        return $this->scopeConfig->getValue(
            'inviqa/general/title',
            $scope
        );
    }

    /*
     * @return string
     */
    public function getSecret($scope = ScopeConfigInterface::SCOPE_TYPE_DEFAULT)
    {
        $secret = $this->scopeConfig->getValue(
            'inviqa/general/secret',
            $scope
        );
        $secret = $this->encryptor->decrypt($secret);

        return $secret;
    }

    /*
     * @return string
     */
    public function getOption($scope = ScopeConfigInterface::SCOPE_TYPE_DEFAULT)
    {
        return $this->scopeConfig->getValue(
            'inviqa/general/option',
            $scope
        );
    }
}
There is a lot of code there, so this needs breaking down.
...
    public function __construct(
        Context $context,
        EncryptorInterface $encryptor
    )
    {
        parent::__construct($context);
        $this->encryptor = $encryptor;
    }
    ...
Here we see that Magento\Framework\Encryption\EncryptorInterface is injected into the constructor. This is used later in the getSecret method (explained below).
...
    public function isEnabled($scope = ScopeConfigInterface::SCOPE_TYPE_DEFAULT)
    {
        return $this->scopeConfig->isSetFlag(
            'inviqa/general/enabled',
            $scope
        );
    }
    ...
Here we add a isEnabled method to retrieve the value 'inviqa/general/enabled' as a boolean. This is achieved using the scopeConfig property, which, as mentioned above, is injected into the parent abstract helper for convenience.
The isSetFlag method is specifically for use with 'Yes/No' boolean configuration selects and returns a boolean value. Additionally, a default scope value is supplied so that the default level scope value is returned if no scope is specified, but anyone using the method is able to specify the scope if needed.
 ...
    public function getTitle($scope = ScopeConfigInterface::SCOPE_TYPE_DEFAULT)
    {
        return $this->scopeConfig->getValue(
            'inviqa/general/title',
            $scope
        );
    }
    ...
This method is more straightforward and follows the same pattern as described above, but uses 'getValue' instead to retrieve the string value of the entry in core_config_data.
...
    public function getSecret($scope = ScopeConfigInterface::SCOPE_TYPE_DEFAULT)
    {
        $secret = $this->scopeConfig->getValue(
            'inviqa/general/secret',
            $scope
        );
        $secret = $this->encryptor->decrypt($secret);

        return $secret;
    }
    ...
This again follows a similar convention to the previous methods. However, instead of returning the raw encrypted value it uses the injected encryptor to decrypt the value before returning.
...
    public function getOption($scope = ScopeConfigInterface::SCOPE_TYPE_DEFAULT)
    {
        return $this->scopeConfig->getValue(
            'inviqa/general/option',
            $scope
        );
    }
    ...
Finally, the value of the custom select is returned here, following the same conventions described above.
Helper usage
With the helper now set up to map the configuration values, it's now just a case of injecting the helper wherever it is needed.
<?php

namespace Inviqa\SystemConfigExample\Block;

use Magento\Framework\View\Element\Template;
use Magento\Framework\View\Element\Template\Context;
use Inviqa\SystemConfigExample\Helper\Data;

class Config extends Template
{
    /**
     * @var Data
     */
    protected $helper;

    public function __construct(Context $context, Data $helper) {
        $this->helper = $helper;
        parent::__construct($context);
    }

    /**
     * @return bool
     */
    public function isEnabled()
    {
        return $this->helper->isEnabled();
    }
}
In the example block the helper is injected into the constructor, and then any of the helper methods can be used in the block methods. Here isEnabled wraps the helper method of the same name to expose its value.
That's all, folks! Scroll down for some related reading and be sure to check out our library of technical tutorials.